Suzuki GSX-R 1000 Service Manual: Cam chain tension adjuster inspection
The cam chain tension adjuster is maintained to proper tension automatically.
- Remove the cam chain tension adjuster. Refer to “engine top side disassembly” .
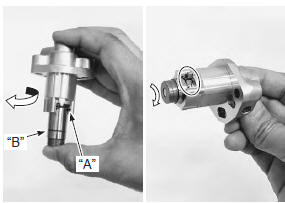
- Holding the cam chain tension adjuster as shown in the figure, compress the plunger by turning the adjuster body until the outer circlip “a” reaches the groove “b”.
- Hook the outer circlip “a” into the groove “b”, then turn the plunger head clockwise more than 90° to make a little play in the inner thread mechanism.
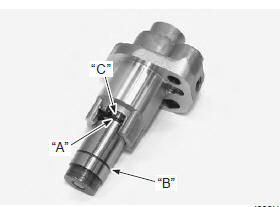
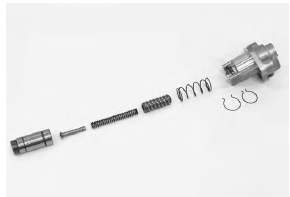
| Note if it is difficult to compress the plunger because of internal engine oil, disassemble the adjuster by releasing the inner circlip “c” and spill out the oil. |
| Caution do not turn the adjuster body until the outer circlip “a” exceeds the groove “b”. If the inner circlip “c” is caught in the groove “b”, plunger may not go out automatically from the adjuster body even if pushing force is applied on the head. In such case, it needs to be disassembled. |
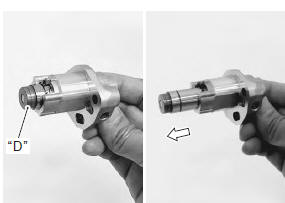
- Check that the plunger goes out automatically when its head “d” is tapped. If it does not work smoothly, replace the cam chain tension adjuster with a new one.
- Install the cam chain tension adjuster. Refer to “engine top side assembly” .
 Camshaft sprocket
Inspect the camshaft sprocket in the following
procedures:
remove the intake and exhaust camshafts. Refer to “engine top side
disassembly” .
Inspect the teeth of each camshaft sp ...
 Cam chain guide / cam chain tensioner
removal and installation
Cam chain guide / cam chain tensioner
removal and installation
Removal
Remove the cylinder head cover. Refer to “engine top side disassembly” .
Remove the cam chain guide no. 2 (1).
Remove the cylinder head. Refer to “engine top side disasse ...
Other materials:
Stv actuator removal and installation
Refer to “throttle body disassembly and assembly” in section 1d .
Caution
never remove the stva from the throttle
body.
Isc valve inspection
Refer to “dtc “c40” (p0505 / p0506 / p0507): isc valve circuit malfunction”
in section 1a .
Isc valve removal and installation
Refer t ...
Swingarm pivot boss removal and installation
Removal
Remove the swingarm. Refer to “swingarm removal and installation” .
Remove the swingarm pivot boss nut (1).
Note
remove the swingarm pivot boss only when
replacing it.
Remove the swingarm pivot boss (2) by removing its
set screws.
Installatio ...
Immobilizer description (for e-02, 19, 24, 51)
The immobilizer, an anti-theft system, is installed as a
standard equipment.
The immobilizer verifies that the key id agrees with ecm
id by means of radio communication through the
immobilizer antenna. When the id agreement is verified,
the system makes the engine ready to start.
...