Suzuki GSX-R 1000 Service Manual: Drive chain replacement
Use the special tool in the following procedures, to cut and rejoin the drive chain.
| Note when using the special tool, apply a small quantity of grease to the threaded parts of the special tool. |
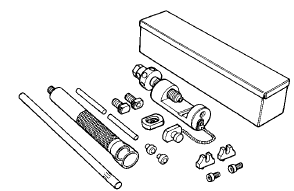
Special tool
 : 09922–22711 (drive chain cutting
and joint
tool set)
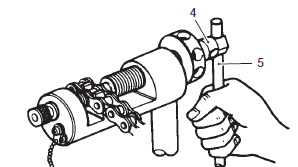
Drive chain cutting
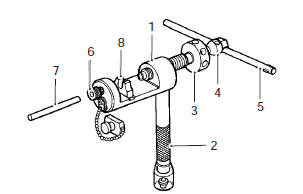
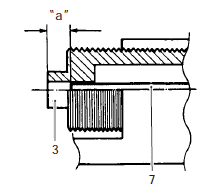
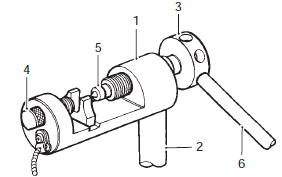
- Set up the special tool as shown in the figure.
|
| Note the tip of pin remover (7) should be positioned inside “a” approximately 5 mm (0.2 In) from the end face of pressure bolt [a] (3) as shown in the figure. |
|
- Place the drive chain link being disjointed on the chain holder (8) of the tool.
- Turn in both the adjuster bolt (6) and pressure bolt [a] (3) so that each of their end hole fits over the chain joint pin properly.
- Tighten the pressure bolt [a] (3) with the bar.
- Turn in the pressure bolt [b] (4) with the bar (5) and force out the drive chain joint pin (9).
| Caution continue turning in the pressure bolt [b] (4) until the joint pin should been completely pushed out of the chain. |
| Note after the joint pin (9) is removed, loosen the pressure bolt [b] (4) and then pressure bolt [a] (3). |
- Remove the joint pin (9) of the other side of joint plate.
| Caution never reuse joint pins, o-rings and plates. |

Drive chain connecting
 Do not use joint
|
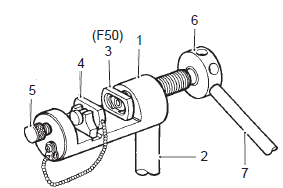
Joint plate installation
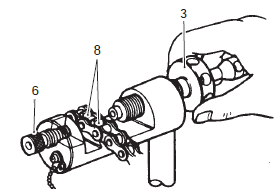
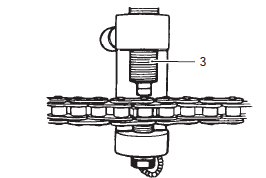
- Set up the special tool as shown in the figure.
|
- Apply grease to the joint pins (8), o-rings (9) and plates (10).
| Caution replace the joint pins (8), o-rings (9) and plates (10) with new ones. |
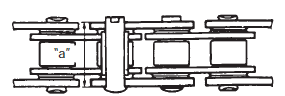
- Connect both ends of the drive chain with the joint pins (8) inserted from the wheel side “a” as installed on the motorcycle.
Joint set part number did: 27620 – 40f20
- Apply grease on the recessed portion of the joint plate holder (3) and set the joint plate (10).
| Note when positioning the joint plate (10) on the tool, its stamp mark must face the joint plate holder (3) side. |
- Set the drive chain on the tool as illustrated and turn in the adjuster bolt (5) to secure the wedge holder and wedge pin (4).

- Turn in the pressure bolt [a] (6) and align two joint pins (8) properly with the respective holes of the joint plate (10).
- Turn in the pressure bolt [a] (6) further using the bar (7) to press the joint plate over the joint pins.

- Continue pressing the joint plate until the distance between the two joint plates comes to the specification.
Joint plate distance specification “a” 20.7 – 21.0 Mm (0.81 – 0.83 In)
| Caution if pressing of the joint plate makes the dimension out of specification excessively, the work must be carried out again by using new joint parts. |
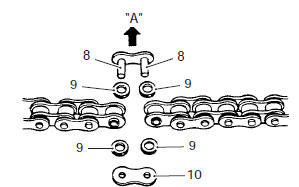
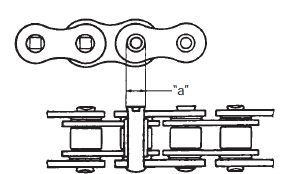
Joint pin staking
- Set up the special tool as shown in the figure.
|
| Note before staking the joint pin, apply a small quantity of grease to the staking pin (5). |
- Stake the joint pin by turning (approximately 7/8 turn) the pressure bolt [a] (3) with the bar until the pin end diameter becomes the specified dimension.
Caution
|
Pin end diameter specification “a” did: 5.7 – 6.0 Mm (0.22 – 0.24 In)
- Adjust the drive chain slack, after connecting it.
Refer to “drive chain inspection and adjustment” in section 0b .
 Sprocket mounting drum dust seal / bearing removal and installation
Removal
Remove the rear wheel assembly. Refer to “rear wheel assembly removal
and installation” in section 2d .
Remove the rear sprocket mounting drum assembly
(1). Refer to “rear spr ...
 Specifications
Service data
Drive train
unit: mm (in) except ratio
Tightening torque specifications
Note
the specified tightening torque is described in the following.
“Drive chain related ...
Other materials:
Engine assembly removal
Before taking the engine out of the frame, wash the
engine using a steam cleaner. Engine removal is
sequentially explained in the following steps:
remove the side cowlings. Refer to “exterior parts
removal and installation” in section 9d (page 9d-
6).
Remove the front seat. R ...
Throttle valve synchronization
Check and adjust the throttle valve synchronization
among four cylinders.
Start the engine and run it in idling condition
for
warming up.
Stop the warmed-up engine.
Lift and support the fuel tank. Refer to “fuel
tank
removal and installation” in section 1g (page ...
Be extra safety-conscious on bad weather days
Riding on bad weather days,
especially wet ones, requires
extra caution. Braking distances
increase on a rainy day. Stay off
the painted surface marks, manhole
covers, and greasy-appearing
areas, as they can be
especially slippery. Use extra caution
at railway crossings and on
metal grating ...