Suzuki GSX-R 1000 Service Manual: Ecm removal and installation
Removal
- Remove the frame covers. Refer to “exterior parts removal and installation” in section 9d (page 9d- 6).
- Disconnect the battery (–) lead wire.
- Remove the tool set (1) and prop stay (2).
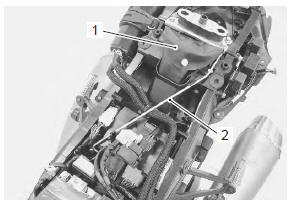
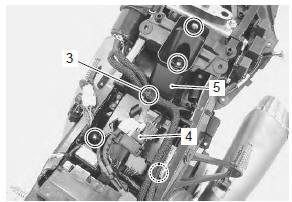
- Disconnect the hose clamp (3) (e-33 only) and starter relay (4).
- Remove the electric parts holder bracket (5).
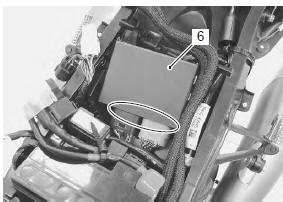
- Disconnect the couplers and remove the ecm (6).
Installation
Install the ecm in the reverse order of removal.
Cmp sensor inspection
Refer to “dtc “c11” (p0340): cmp sensor circuit malfunction” in section 1a .

 Cmp sensor removal and installation
Removal
Remove the air cleaner box. Refer to “air cleaner box removal and
installation” in section 1d .
Remove the pair control solenoid valve. Refer to “pair control solenoid
valve ...
Other materials:
Engine top side assembly
Assemble the engine top side in the reverse order of
disassembly. Pay attention to the following points:
Cylinder head
Install the dowel pins and a new cylinder head gasket
(1) to the cylinder.
Caution
use a new gasket to prevent gas leakage.
Place the cylinder head ...
Front brake components
Seal set
Piston and seal set
Brake pad spring
Brake pad set
Front brake disc
7.5
N·m (0.75 Kgf-m, 5.5 Lbf-ft)
15 N·m (1.5
Kgf-m, 11.0 Lbf-ft)
39 N·m (3.9
Kgf-m, 28.0 Lbf-ft)
18 N·m (1.8
Kgf-m, 13.0 Lbf-ft)
Apply thread lo ...
Exterior parts construction
Upper cowling bracket
: set the punch mark to the front and upper side.
Rear view mirror cushion
: set the dent side to inside.
To frame
To headlight assembly
To sprocket cove
To side-stand bracket
...