Suzuki GSX-R 1000 Owners Manual: Location of parts
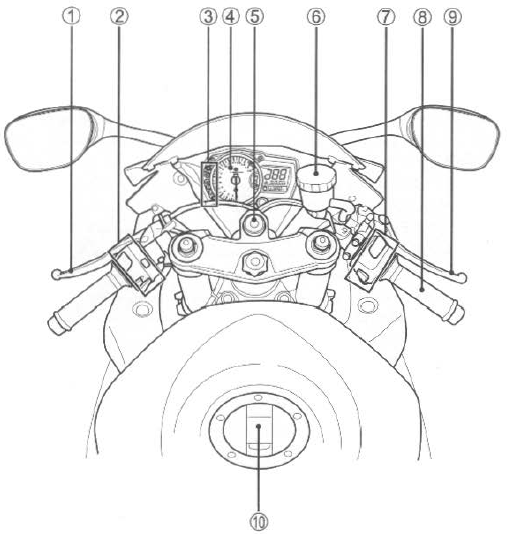
- ciutch lever
- left handlebar switches
- indicator lights
- tachometer
- ignition switch
- front brake fluid reservoir
- right handlebar switches
- throttle grip
- front brake lever
- fuel tank cap
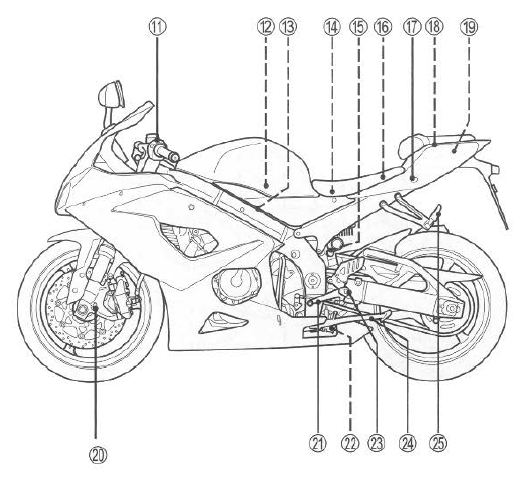
- front suspension spring pre-load and rebound damping force adjuster
- air cleaner
- throttle stop screw
- battery
- rear suspension compression damping force adjuster
- main fuse
- seat lock
- helmet holders
- tools
- front suspension compression damping force adjuster
- gearshift lever
- rear suspension rebound damping force adjuster
- footrests
- side stand
- passenger footrests
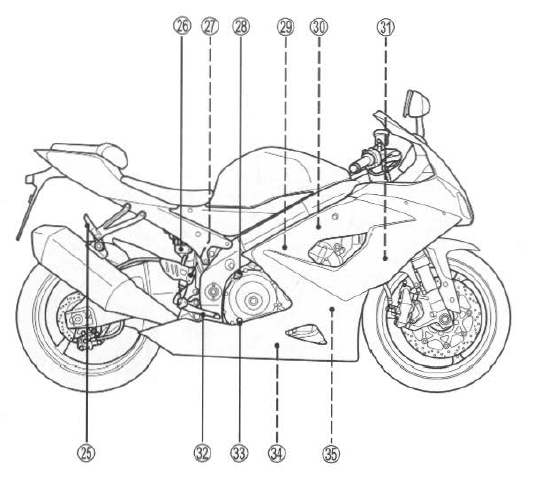
- rear brake fluid reservoir
- rear brake light switch
- engine oil filler cap
- fuses
- spark plugs
- engine coolant reservoir
- rear brake pedal
- engine oil inspection window
- engine oil drain plug
- engine oil filter

 Key
Key
Two keys come with this motorcycle.
Keep the spare key in a safe
place. An identifying number is
stamped on the plate. Use this
number when making a replacement
key.
Please write down yo ...
Other materials:
Headlight
To replace the headlight bulbs,
perform the following steps:
Upper light bulb
Remove the bolt 1 to lift the
instrument panel 2.
Turn the cap 3 counterclockwise
and remove it.
Unhook the bulb holder spring
4 and pull out the socket 5.
Pull off the bulb from ...
Specifications
Service data
Valve + guide
unit: mm (in)
Camshaft + cylinder head
unit: mm (in)
Cylinder + piston + piston ring
unit: mm (in)
Conrod + crankshaft
unit: mm (in)
Balancer
unit: mm (in)
Oil pump
Clutch
unit: mm (in)
Drive train
unit: mm (in) except ratio
...
Wheel balance check and adjustment
Check and adjust the wheel balance in the following
procedures:
removal the wheel assembly. Refer to “front wheel assembly removal and
installation” and “rear wheel assembly removal and installation” .
Remove the mounting drum from the rear wheel.
(For rear wheel) ref ...