Suzuki GSX-R 1000 Service Manual: Rear brake caliper removal and installation
Removal
- Remove the rear wheel. Refer to “rear wheel assembly removal and installation” in section 2d .
- Drain brake fluid. Refer to “brake fluid replacement” in section 4a .
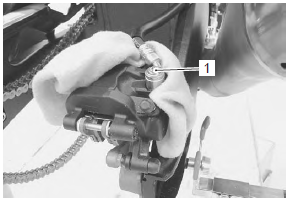
- Remove the brake hose from the caliper by removing the union bolt (1) and catch the brake fluid in a suitable receptacle.
- Remove the brake pads. Refer to “rear brake pad replacement” .
| Note place a rag underneath the union bolt on the brake caliper to catch any spilt brake fluid. |
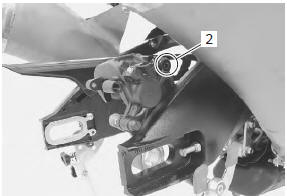
- Remove the caliper by removing the sliding pin a (2).
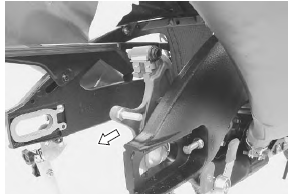
- Remove the caliper bracket (3) from the swingarm.
Installation
Install the brake caliper in the reverse order of removal.
Pay attention to the following points:
- apply grease to the sliding pins.
 : Grease 99000–25100 (suzuki
silicone
grease or equivalent)
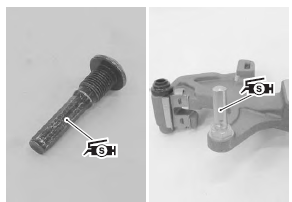
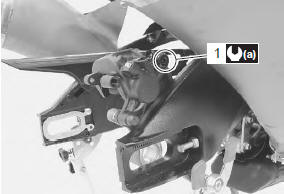
- Tighten the caliper sliding pin a (1) to the specified torque.
Tightening torque rear brake caliper sliding pin a (a): 27 n·m (2.7 Kgf-m, 19.5 Lbf-ft)
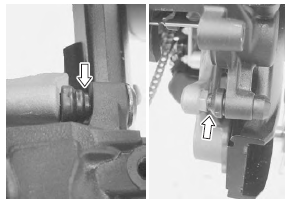
- Fit each boot end into the sliding pin groove.
- Install the rear wheel. Refer to “rear wheel assembly removal and installation” in section 2d .
- Install the brake pads. Refer to “rear brake pad replacement” .
- After setting the brake hose union to the stopper, tighten the union bolt (2) to the specified torque.
| Caution the seal washers should be replaced with the new ones to prevent fluid leakage. |
Tightening torque brake hose union bolt (b): 23 n·m (2.3 Kgf-m, 16.5 Lbf-ft)

- Bleed air from the brake system after installing the caliper. Refer to “air bleeding from brake fluid circuit” in section 4a .
- Check the brake fluid leakage and brake operation.
 Brake fluid, if it
Check the brake hose and hose joints for cracks and fluid leakage. |
 Rear brake pad replacement
Remove the plug (1) and brake pad mounting pin (2).
Remove the brake pads (3).
Caution
do not operate the brake pedal while the
pads are removed.
Clean up the ...
 Rear brake caliper disassembly and
assembly
Rear brake caliper disassembly and
assembly
Refer to “rear brake caliper removal and installation” .
Disassembly
Remove the pad spring (1) and rubber boot (2) from
the caliper.
Place a rag over the piston to prevent it from pop ...
Other materials:
Dtc “c36” (p1764), “c37” (p1765), “c38” (p1766) or “c39” (p1767): secondary
fuel injector circuit
malfunction
Detected condition and possible cause
Detected condition
Possible cause
Some failure exists in the fuel injector signal in a high
load, high revolution condition.
Injector circuit open or short.
Injector malfunction.
Ecm malfunction.
...
Special situations require special care
Of course, there are some times
when full-force braking is not the
correct technique. When the road
surface is wet, loose, or rough,
you should brake with care. When
you're leaned over in a corner,
avoid braking. Straighten up
before braking. Better yet, slow
down before entering the corner. ...
Air cleaner element removal and installation
Removal
Lift and support the fuel tank. Refer to “fuel tank
removal and installation” in section 1g (page 1g-
9).
Remove the air cleaner box cover (1).
Remove the air cleaner element (2).
Installation
Installation is in the reverse order of removal. ...