Suzuki GSX-R 1000 Service Manual: Rear shock absorber adjustment
After installing the rear suspension, adjust the spring pre-load and damping force as follows:
Spring pre-load adjustment
- The set length 179.3 Mm (7.06 In) provides the maximum spring pre-load.
- The set length 189.3 Mm (7.45 In) provides the minimum spring pre-load.
Std position 184.3 Mm (7.26 In)
Damping force adjustment
Note
|
Rebound side
Fully turn the rebound damping force adjuster (1) clockwise. From that position (stiffest), turn it out to standard setting position.
Std position 2-3/4 turns out from stiffest position
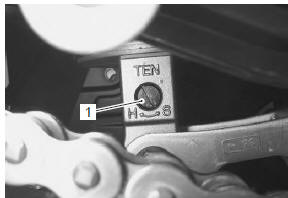
Compression side (low speed)
Fully turn the compression damping force (low speed) adjuster (1) clockwise. From that position (stiffest), turn it out to standard setting position.
Std position 2-1/4 turns out of from stiffest position

Compression side (high speed)
Fully turn the compression damping force (high speed) adjuster (1) clockwise. From that position (stiffest), turn it out to standard setting position.
Std position 3 turns out of from stiffest position
 Rear shock absorber bearing removal and installation
Removal
Remove the rear shock absorber. Refer to “rear shock absorber removal
and installation” .
Remove the spacer (1).
Remove the rear shock absorber bearing with the
spec ...
 Rear shock absorber disposal
Refer to “rear shock absorber removal and installation” .
The rear shock absorber unit contains high-pressure
nitrogen gas.
Mishandling can cause explosion.
Keep away from f ...
Other materials:
Regulator / rectifier construction
Regulator/rectifier
Regulator/rectifier bracket
Air intake pipe (rh)
Spacer
Wiring harness
Connect
the regulator/rectifier couplers under the wiring harness
10
N·m (1.0 Kgf-m, 7.0 Lbf-ft)
...
Fuel tank cap
To open the fuel tank cap, insert
the ignition key into the lock and
turn it clockwise. With the key
inserted, lift up with the key and
open the fuel tank cap. To close
the fuel tank cap, push the cap
down firmly with the key in the cap
lock.
Fuel level
Fi ller neck
Wa ...
Light bulb replacement
The wattage rating of each bulb is
shown in the following chart.
When replacing a burned-out
bulb, always use the same wattage
rating according to the following
chart.
Caution
Using a light bulb with the
wrong wattage rating can
cause electrical system damage
or shorte ...