Suzuki GSX-R 1000 Service Manual: Rear sprocket / rear sprocket mounting drum removal and installation
Removal
- Remove the rear wheel assembly. Refer to “rear wheel assembly removal and installation” in section 2d .
- Loosen the rear sprocket nuts.
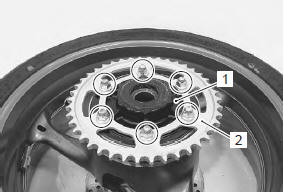
- Draw out the rear sprocket mounting drum (1) along with the rear sprocket (2) from the wheel hub.
- Remove the rear sprocket nuts and separate the rear sprocket (2) from its mounting drum (1).
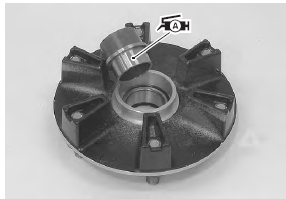
- Remove the retainer (3).

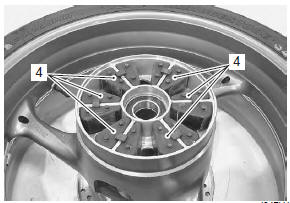
- Remove the wheel dampers (4).
Installation
Install the rear sprocket and rear sprocket mounting drum in the reverse order of removal. Pay attention to the following points:
- apply grease to the contacting surface between the rear wheel hub and rear sprocket mounting drum.
 : Grease 99000–25010 (suzuki
super
grease “a” or equivalent)
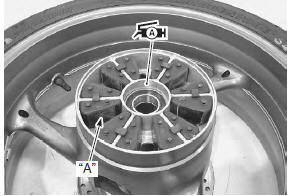
- Apply special tire lubricant or neutral soapy liquid to the wheel damper surfaces “a”.
| Caution never use oil, grease or gasoline on the wheel damper in place of the tire lubricant or neutral soapy liquid. |
- Apply grease to the retainer.
 : Grease 99000–25010 (suzuki
super
grease “a” or equivalent)
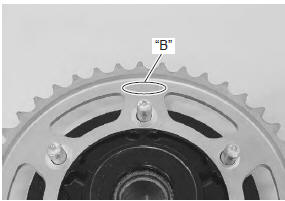
- Install the rear sprocket so that the letters “b” face outside.
- Tighten the rear sprocket nuts to the specified torque.
Tightening torque rear sprocket nut (a): 60 n·m (6.0 Kgf-m, 43.0 Lbfft)

- Install the rear wheel assembly. Refer to “rear wheel assembly removal and installation” in section 2d .
 Engine sprocket removal and installation
Removal
Remove the gearshift link arm (1) from the gearshift
shaft.
Note
mark the gearshift shaft head at which the
gearshift link arm slit set for correct
reinstallation.
...
 Drive chain related parts inspection
Refer to “rear sprocket / rear sprocket mounting drum removal and
installation” .
Dust seal
Inspect the dust seal for wear or damage. If any damage
is found, replace the dust seal with a new one. ...
Other materials:
Fuel pump relay inspection
Refer to “electrical components location” in section 0a .
Inspect the fuel pump relay in the following procedures:
remove the frame covers. Refer to “exterior parts
removal and installation” in section 9d (page 9d-
6).
Remove the fuel pump relay (1).
First, check f ...
Oil cooler / oil cooler hose removal and
installation
Refer to “electrical components location” in section 0a .
Removal
Turn the ignition switch off.
Remove the left side cowling. Refer to “exterior parts removal and
installation” in section 9d .
Drain engine oil. Refer to “engine oil and filter replacement” in
section 0b .
...
Water pump construction
Impeller
Mechanical seal
Oil seal
O-ring
O-ring
8
N·m (0.8 Kgf-m, 6.0 Lbf-ft)
10 N·m
(1.0 Kgf-m, 7.0 Lbf-ft)
Apply grease.
Apply engine coolant.
Apply molybdenum oil
solution.
Do not reuse.
...