
Suzuki GSX-R 1000 Service Manual: Turn signal / side-stand relay removal and installation
Removal
- Remove the frame cover. Refer to “exterior parts removal and installation” in section 9d (page 9d- 6).
- Remove the turn signal/side-stand relay (1).
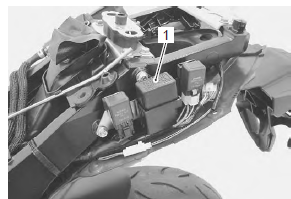
Installation
Install the turn signal/side-stand relay in the reverse order of removal.
 Turn signal / side-stand relay inspection
Refer to “electrical components location” in section 0a .
Note
make sure that the battery is fully charged.
Before removing the turn signal/side-stand relay, check
the operation of t ...
 Hazard switch inspection
Inspect the hazard switch in the following procedures:
remove the air cleaner box. Refer to “air cleaner box removal and
installation” in section 1d .
Disconnect the left handleba ...
Other materials:
Headlight
To replace the headlight bulbs,
perform the following steps:
Upper light bulb
Remove the bolt 1 to lift the
instrument panel 2.
Turn the cap 3 counterclockwise
and remove it.
Unhook the bulb holder spring
4 and pull out the socket 5.
Pull off the bulb from ...
Oil pump inspection
Inspect the oil pump in the following procedures:
remove the oil pump. Refer to “oil pump removal and installation” .
Rotate the oil pump by hand and check that it moves
smoothly. If it does not move smoothly, replace the
oil pump assembly.
Caution
do not attempt t ...
Headlight removal and installation
Removal
Remove the body cowling assembly. Refer to “exterior parts removal and
installation” in section 9d .
Remove the air intake pipes (1). Refer to “exterior parts removal and
installation” in section 9d .
Remove the wiring harness no. 2 (2) By
disconnecting the couplers and ...