Suzuki GSX-R 1000 Service Manual: Ignition coil and spark plug removal and installation
Removal
 The hot The hot
engine can burn you. Wait until the engine is cool enough to touch. |
- Turn the ignition switch off.
- Remove the air cleaner box. Refer to “air cleaner box removal and installation” in section 1d .
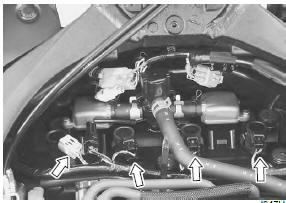
- Disconnect the lead wire couplers (1).
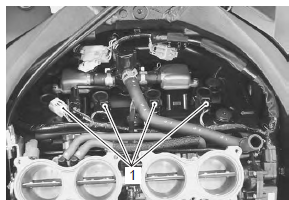
| Caution disconnect the lead wire coupler before removing the ignition coil to avoid lead wire coupler damage. |
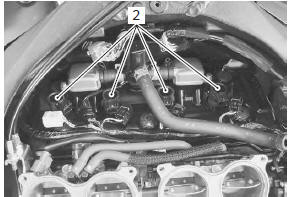
- Remove the ignition coils (2).
Caution
|
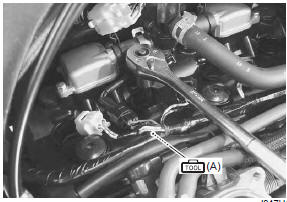
- Remove the spark plugs with the spark plug wrench.
Special tool
 (a): 09930–10121 (spark plug wrench
set)
Installation
Install the spark plugs in the reverse order of removal.
Pay attention to the following points:
- screw the spark plugs into the cylinder head with fingers, and then tighten them to the specified torque.
| Caution do not cross thread or over tighten the spark plug, or such an operation will damage the aluminum threads of the cylinder head. |
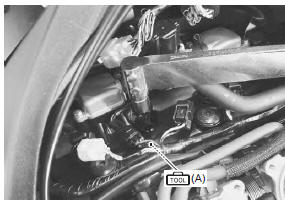
Special tool
 (a): 09930–10121 (spark plug wrench
set)
Tightening torque spark plug: 11 n·m (1.1 Kgf-m, 8.0 Lbf-ft)
- Install the ignition coil and connect their lead wire couplers.
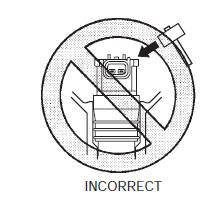
| Caution do not hit the ignition coil with a plastic hammer when installing it. |
Spark plug inspection and cleaning
Refer to “spark plug inspection and cleaning” in section 0b .

 Ignition coil inspection
Refer to “electrical components location” in section 0a .
Ignition coil primary peak voltage
Remove the air cleaner box. Refer to “air cleaner box removal and
installation” in section 1d .
D ...
Other materials:
General precautions
Proper service and repair procedures are
important for the safety of the service
mechanic and the safety and reliability of
the motorcycle.
When 2 or more persons work together,
pay attention to the safety of each other.
When it is necessary to run the ...
Foreword
Motorcycling is one of the most
exhilarating sports and to ensure
your riding enjoyment, you should
become thoroughly familiar with
the information presented in this
owner's manual before riding the
motorcycle.
The proper care and maintenance
that your motorcycle requires is
outlined in t ...
Fuel pump disassembly and assembly
Disassembly
Remove the fuel tank. Refer to “fuel tank removal and installation” .
Remove the fuel pump assembly (1) by removing its
mounting bolts diagonally.
Spilled gasoline should be wipe off
immediately.
Keep away from fire or spark.
Work in a wel ...