Suzuki GSX-R 1000 Owners Manual: Brake pad
Front

Rear
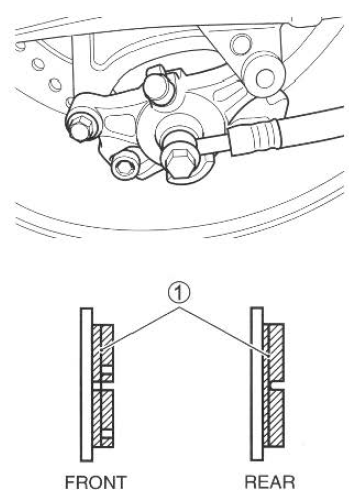
Inspect the front and rear brake pads to see if they are worn down to the grooved wear limit line 1. If a pad is worn to the grooved wear limit line, it must be replaced with a new one. After replacing either the front or rear brake pads, the brake lever or pedal must be pumped several times. This will extend the pads to their proper position.
 Warning Warning
Inspect brake pad wear before each use. Ask your suzuki dealer or qualified mechanic to replace brake pads if any pad is worn to the limit. |
| Warning
Before riding, "pump" the brake repeatedly until brake pads are pressed against the brake disks and proper lever/ pedal stroke and firm feel are restored. |
Note
: do not squeeze/depress the brake lever/pedal when the pads are not in their positions. It is difficult to push the pistons back and brake fluid leakage may result.
 Brake fluid
Check the brake fluid level in both front and rear brake fluid reservoirs. If
the level in either reservoir is below the lower mark, inspect for brake pad
wear and leaks.
Warning
Br ...
 Rear brake pedal adjustment
The rear brake pedal position
must be properly adjusted at all
times or the disk brake pads will
bear against the disk causing
damage to the pads and to the
disk surface. Adjust the brake
pedal ...
Other materials:
Most accidents can be avoided
The most common type of motorcycle
accident in the u.S. Occurs
when a car traveling towards a
motorcycle turns left in front of the
motorcycle. Is that because other
drivers are out to get motorcyclists?
No. Other drivers simply
don't always notice motorcyclists.
Ride defensively. Wise mot ...
Engine components removable with the
engine in place
Engine components which can be removed while the engine is installed on the
frame are as follows. For the installing
and removing procedures, refer to respective paragraphs describing each
component.
Center of engine
Item
Removal
Inspection
Installation
...
If you don't have a helmet, buy a helmet and wear it every
time you ride
Most accidents occur within a few
miles of home, and almost half
occur at speeds of less than 30
mph. So even if you're just going
on a quick errand, be preparedstrap
on your helmet before you
take off.
Helmets do not reduce essential
vision or hearing. Generally, helmets
do not cause or ...