Suzuki GSX-R 1000 Service Manual: Front brake pad replacement
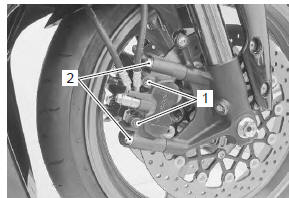
- Loosen the pad mounting pins (1).
- Remove the brake caliper by removing the caliper mounting bolts (2).
- Remove the pad mounting pins (1), brake pads and spring.
| Caution do not operate the brake lever while the pads are removed. |
| Note when removing the pads and pad spring, push the pistons all the way into the brake caliper. |
- Clean up the caliper especially around the caliper pistons.
- When installing the spring to caliper, bring its wider pawl “a” to top side.
- Install new brake pads and temporarily tighten the pad mounting pins.
| Caution replace the brake pads as a set, otherwise braking performance will be adversely affected. |
- Install the brake caliper.
- Tighten the front brake caliper mounting bolts (2) and front brake pad mounting pins (1) to the specified torque.
Tightening torque front brake caliper mounting bolt (a): 39 n·m ( 3.9 Kgf-m, 28.0 Lbf-ft) front brake pad mounting pin (b): 15 n·m (1.5 Kgf-m, 11.0 Lbf-ft)

| Note after replacing the brake pads, pump the brake lever several times to check for proper brake operation and then check the brake fluid level. |
 Front brake pad inspection
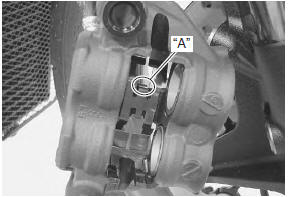
The extent of brake pads wear can be checked by observing the grooved limit
line “a” on the pads. When the wear exceeds the grooved limit line, replace the
pads with new ones. Refer to “front brak ...
 Front brake caliper removal and installation
Note
the right and left calipers are installed
symmetrically and therefore the removal
procedure for one side is the same as that for
the other side.
Removal
Drain brake f ...
Other materials:
Rod guide case tightening torque
Tighten the rod guide case in the following procedures:
measure the effective length l of the torque wrench.
Calculate the reading torque on the torque wrench by
use of the formula shown below.
Special tool
(a): 09940–84710 (rod guide case
wrench)
T: reading torque on the torq ...
Cam chain guide inspection
Inspect the cam chain guide in the following procedures:
remove the cam chain guides. Refer to “cam chain guide / cam chain
tensioner removal and installation” .
Check the contacting surface of the cam chain
guides. If it is worn or damaged, replace it with a new
one.
...
Crankcase breather (pcv) hose inspection
Inspect the crankcase breather (pcv) hose in the
following procedures:
lift and support the fuel tank with the prop stay.
Refer to “fuel tank removal and installation” in section 1g .
Inspect the crankcase breather (pcv) hose (1) for
wear and damage.
If it is worn or damaged ...