Suzuki GSX-R 1000 Service Manual: Fuel tank removal and installation
Removal
|
|

- Remove the front seat. Refer to “exterior parts removal and installation” in section 9d (page 9d- 6).
- Take out the fuel tank prop stay (1).
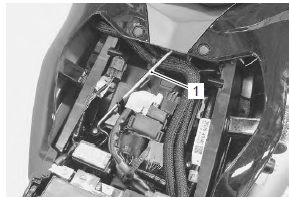
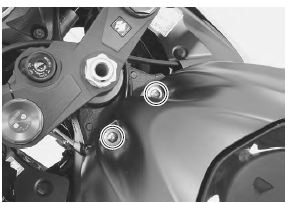
- Remove the bolts.
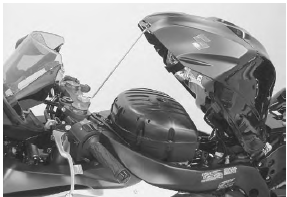
- Lift and support the fuel tank with the prop stay.
- Disconnect the fuel pump lead wire coupler (2).
- Place a rag under the fuel feed hose (3) and disconnect the fuel feed hose from the fuel tank.
| Caution when removing the fuel tank, do not leave the fuel feed hose on the fuel pump side. |
- Disconnect the fuel tank drain hose (4).
- Disconnect the surge hose (5). (For e-33)
- disconnect the fuel tank breather hose. (Except for e-33)
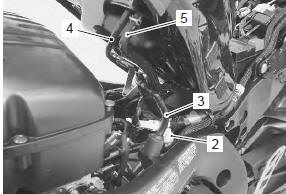
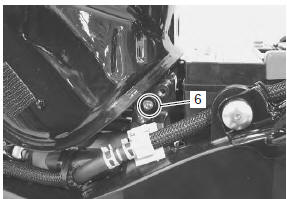
- Remove the fuel tank by removing its bracket bolt (6).
Installation
Install the fuel tank in the reverse order of removal.
Pay attention to the following point:
| Note connect the fuel feed hose to the fuel pump until it locks securely (a click is heard). |
 Fuel tank construction
Fuel tank heat
shield
: aluminum film side should face the engine side.
Fuel tank front cover
Fuel tank front bracket
Velcro fastenings
: clean the adhesiv ...
 Fuel pump components
Fuel level gauge
Fuel pressure regulator assembly
O-ring
Joint
Fuel pump
Fuel pump case
Fuel mesh filter
10
N·m (1.0 Kgf-m, 7.0 Lbf-ft)
Appl ...
Other materials:
Drive mode selector inspection
Inspect the drive mode selector in the following procedures:
set up the sds tool. (Refer to the sds operation manual for
further details.)
Turn the ignition switch on.
Click “data monitor”.
Make sure each of “driving mode selection” on the monitor is
indicated ...
Headlight bulb and position light bulb
replacement
Caution
when you touch the bulb with your bare
hands, clean the bulb with a cloth moistened
with alcohol or soap water to prevent
premature bulb failure.
Low beam bulb
Remove the combination meter. Refer to “combination meter removal and
installation” in section 9c .
...
Excva adjustment
Inspect the excva operation and adjust it if necessary
in the following steps:
Step 1
Set the excva to the adjustment position. Refer to
“excv cable removal and installation” (page 1k-
6).
Step 2
Turn the ignition switch off.
Turn the mode select switch off.
Turn the ...