Suzuki GSX-R 1000 Service Manual: Front brake caliper removal and installation
| Note the right and left calipers are installed symmetrically and therefore the removal procedure for one side is the same as that for the other side. |
Removal
- Drain brake fluid. Refer to “brake fluid replacement” in section 4a .
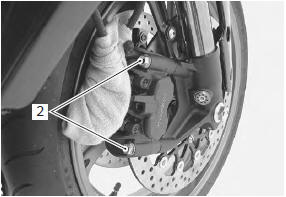
- Remove the brake hose from the caliper by removing the union bolt (1) and catch the brake fluid in a suitable receptacle.
| Note place a rag underneath the union bolt on the brake caliper to catch any spilt brake fluid. |
- Remove the brake caliper by removing its mounting bolts (2).
Installation
Install the brake caliper in the reverse order of removal.
Pay attention to the following points:
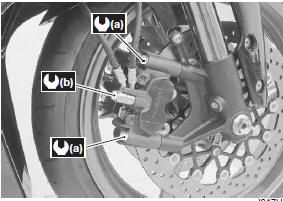
- tighten each bolt to the specified torque.
Tightening torque front brake caliper mounting bolt (a): 39 n·m (3.9 Kgf-m, 28.0 Lbf-ft)
- After setting the brake hose union to the stopper, tighten the union bolt to the specified torque.
| Caution the seal washers should be replaced with the new ones to prevent fluid leakage. |
Tightening torque brake hose union bolt (b): 23 n·m (2.3 Kgf-m, 16.5 Lbf-ft)
- Bleed air from the brake system after installing the caliper. Refer to “air bleeding from brake fluid circuit” in section 4a .
- Check the brake fluid leakage and brake operation.
 Brake fluid, if it
Check the brake hose and hose joints for cracks and fluid leakage. |
 Front brake pad replacement
Loosen the pad mounting pins (1).
Remove the brake caliper by removing the caliper
mounting bolts (2).
Remove the pad mounting pins (1), brake pads and
spring.
Caution ...
 Front brake caliper disassembly and
assembly
Front brake caliper disassembly and
assembly
Refer to “front brake caliper removal and installation” .
Note
the right and left calipers are installed
symmetrically and therefore the disassembly
procedure for one side is the same ...
Other materials:
Brake fluid replacement
Caution
handle brake fluid with care: the fluid reacts
chemically with paint, plastic, rubber
materials, etc.
Front brake
Place the motorcycle on a level surface and keep the
handlebars straight.
Remove the brake fluid reservoir cap and
diaphragm.
Suck u ...
Schematic and routing diagram
Cooling circuit diagram
Water hose routing diagram
Thermostat air bleeder hole
Cushion
O-ring
Radiator heat guard
: be careful not to damage the pawls when removing.
Yellow
marking
White
marking
Clamp end
should face downward
...
Front turn signal light bulb replacement
Caution
when you touch the bulb with your bare
hands, clean the bulb with a cloth moistened
with alcohol or soap water to prevent
premature bulb failure.
Remove the turn signal light assembly.
Remove the socket (1) by turning it
counterclockwise.
Repla ...