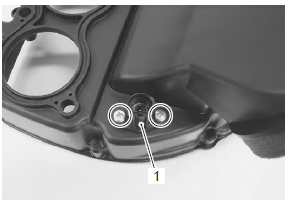
Suzuki GSX-R 1000 Service Manual: Iat sensor removal and installation
Removal
- Remove the air cleaner box. Refer to “air cleaner box removal and installation” in section 1d .
- Remove the iat sensor (1) from the air cleaner box.
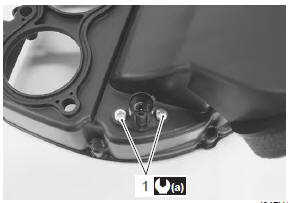
Installation
Install the iat sensor in the reverse order of removal.
Pay attention to the following point:
- tighten the iat sensor screw (1) to the specified torque.
Tightening torque iat sensor mounting screw (a): 1.3 N·m (0.13 Kgfm, 1.0 Lbf-ft)
 Ect sensor inspection
Refer to “dtc “c15” (p0115-h/l): ect sensor circuit malfunction” in section
1a .
Inspect the ect sensor in the following procedures:
remove the ect sensor. Refer to “ect sensor removal ...
 Iat sensor inspection
Refer to “dtc “c21” (p0110-h/l): iat sensor circuit malfunction” in section
1a .
Inspect the iat sensor.
Note
iat sensor resistance measurement method
is the same way as that of the ...
Other materials:
Rear lighting system construction
License plate light assembly
Reflex reflector (e-03, 28, 33 only)
Clamp
: clamp the license plate light lead wire
so as not to be slack.
Rear combination light
Rear turn signal light assembly (lh/rh)
5
N·m (0.5 Kgf-m, 3.5 Lbf-ft)
1.8 N·m
...
Specifications
Service data
Drive train
unit: mm (in) except ratio
Tightening torque specifications
Note
the specified tightening torque is described in the following.
“Drive chain related components”
Reference: for the tightening torque of fastener not specified in this
section ...
Oil pressure regulator / oil strainer
inspection
Refer to “oil pan / oil pressure regulator / oil strainer removal and
installation” .
Oil pressure regulator
Inspect the operation of the oil pressure regulator by
pushing the piston with a proper bar.
If the piston does not operate smoothly, replace the oil
pressure regulator with a new on ...