Suzuki GSX-R 1000 Service Manual: Iat sensor inspection
Refer to “dtc “c21” (p0110-h/l): iat sensor circuit malfunction” in section 1a .
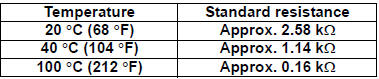
Inspect the iat sensor.
| Note iat sensor resistance measurement method is the same way as that of the ect sensor. Refer to “ect sensor inspection” (page 1c- 4). |
Caution
|
Iat sensor specification
Ap sensor inspection
Refer to “dtc “c22” (p1450-h/l): ap sensor circuit malfunction” in section 1a .
 Iat sensor removal and installation
Removal
Remove the air cleaner box. Refer to “air cleaner box removal and
installation” in section 1d .
Remove the iat sensor (1) from the air cleaner box.
Installation
Install ...
 Ap sensor removal and installation
Removal
Remove the front seat. Refer to “exterior parts
removal and installation” in section 9d (page 9d-
6).
Disconnect the starter relay (1) from the holder.
Disconnect the ...
Other materials:
Specifications
Service data
Brake
unit: mm (in)
Tightening torque specifications
Note
the specified tightening torque is described in the following.
“Front brake hose routing diagram” “rear brake hose routing
diagram” “front brake master cylinder components” “rear
...
Special tools and equipment
Recommended service material
Note
required service material is also described in the following.
“Water hose routing diagram” “water pump components” “water
pump construction”
Special tool
...
Special tools and equipment
Recommended service material
Note
required service material is also described in the following.
“Rear lighting system construction”
Special tool
...