Suzuki GSX-R 1000 Service Manual: Ap sensor removal and installation
Removal
- Remove the front seat. Refer to “exterior parts removal and installation” in section 9d (page 9d- 6).
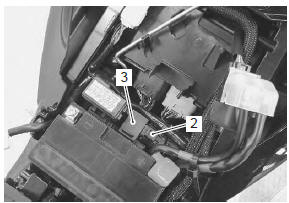
- Disconnect the starter relay (1) from the holder.
- Disconnect the coupler (2) and remove the ap sensor (3).
Installation
Install the ap sensor in the reverse order of removal.
To sensor inspection
Refer to “dtc “c23” (p1651-h/l): to sensor circuit malfunction” in section 1a .
 Iat sensor inspection
Refer to “dtc “c21” (p0110-h/l): iat sensor circuit malfunction” in section
1a .
Inspect the iat sensor.
Note
iat sensor resistance measurement method
is the same way as that of the ...
 To sensor removal and installation
Removal
Remove the ap sensor. Refer to “ap sensor removal and installation” .
Disconnect the coupler (1) and remove the to
sensor (2).
Installation
Install the to sensor in the r ...
Other materials:
DTC “c91” (p0500): vehicle speed sensor
circuit malfunction
Detected condition and possible cause
Detected condition
Possible cause
Speedometer does not receive signal from the vehicle
speed sensor for more than 6 sec. When the motorcycle is
running. Ecm does not receive signal from the vehicle
speed sensor for more than ...
Front turn signal light bulb replacement
Caution
when you touch the bulb with your bare
hands, clean the bulb with a cloth moistened
with alcohol or soap water to prevent
premature bulb failure.
Remove the turn signal light assembly.
Remove the socket (1) by turning it
counterclockwise.
Repla ...
Special situations require special care
Of course, there are some times
when full-force braking is not the
correct technique. When the road
surface is wet, loose, or rough,
you should brake with care. When
you're leaned over in a corner,
avoid braking. Straighten up
before braking. Better yet, slow
down before entering the corner. ...