
Suzuki GSX-R 1000 Service Manual: Wheel balance check and adjustment
Check and adjust the wheel balance in the following procedures:
- removal the wheel assembly. Refer to “front wheel assembly removal and installation” and “rear wheel assembly removal and installation” .
- Remove the mounting drum from the rear wheel.
(For rear wheel) refer to “rear wheel assembly removal and installation” .
- Check the wheel balance using the balancer and adjust the wheel balance if necessary.
| Caution for operating procedures, refer to the instructions supplied by the wheel balancer manufacturer. |
- When installing the balancer weight to the wheel, set the balancer weight on center rib of the wheel.
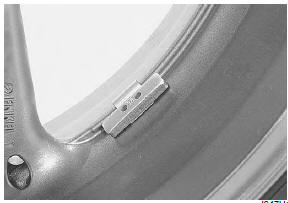
- Recheck the wheel balance.
- Install the mounting drum to the rear wheel. (For rear wheel) refer to “rear wheel assembly removal and installation” .
- Install the wheel assembly. Refer to “front wheel assembly removal and installation” and “rear wheel assembly removal and installation” .
 Air valve removal and installation
Removal
Remove the wheel assembly. Refer to “front wheel assembly removal and
installation” and “rear wheel assembly removal and installation” .
Remove the tire. Refer to “tire re ...
 Specifications
Service data
Wheel
unit: mm (in)
Tire
Tightening torque specifications
Note
the specified tightening torque is described in the following.
“Front wheel components” ...
Other materials:
Front wheel assembly removal and installation
Removal
Remove the brake calipers, left and right.
Caution
do not operate the brake lever with the
caliper removed.
Loosen two axle pinch bolts (1) on the right front fork
leg.
Remove the front axle bolt (2).
Raise the front wheel off the ground a ...
DTC “c60” (p0480): cooling fan relay
circuit malfunction
Detected condition and possible cause
Detected condition
Possible cause
Cooling fan relay signal is not input to ecm.
Cooling fan relay circuit open or short.
Ecm malfunction.
Wiring diagram
Troubleshooting
Caution
when using ...
Battery
Battery connection in reverse polarity is strictly
prohibited. Such a wrong connection will damage the
components of the fi system instantly when reverse
power is applied.
Removing any battery terminal of a running engine is
strictly prohibited. The moment such removal is made,
...