Suzuki GSX-R 1000 Service Manual: Fuel discharge amount inspection
|
|

Inspect the fuel discharge amount in the following procedures:
- lift and support the fuel tank. Refer to “fuel tank removal and installation” .
- ) Place a rag under the fuel feed hose (1) and disconnect fuel feed hose from the fuel pump.
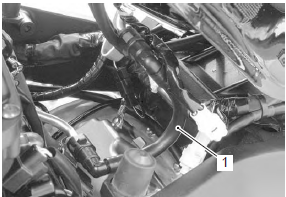
- Connect a proper fuel hose (2) to the fuel pump.
- Place the measuring cylinder and insert the fuel hose end into the measuring cylinder.
- Disconnect the fuel pump lead wire coupler (3).
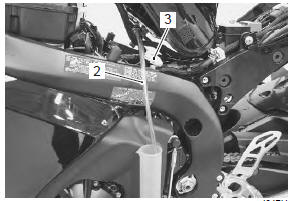
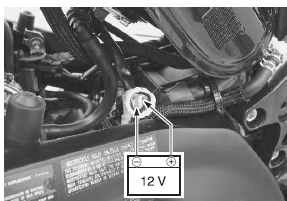
- Connect a proper lead wire into the fuel pump lead
wire coupler (fuel pump side) and apply 12 v to the
fuel pump (between (+) y/r wire and (–) b/w wire)
for 10 seconds and measure the amount of fuel
discharged.
If the discharge amount is out of the specification, the probable cause may be failure of the fuel pump or clogged fuel filter.
| Note the battery must be in fully charged condition. |
Fuel discharge amount 222 ml (7.5/7.8 Us/lmp oz) and more/10 seconds
- After finishing the fuel discharge inspection, reinstall the fuel tank. Refer to “fuel tank removal and installation” .
| Note connect the fuel feed hose to the fuel pump until it locks securely (a click is heard). |
 Fuel pump inspection
Turn the ignition switch on and check that the fuel pump
operates for a few seconds.
If the fuel pump motor does not make operating sound, inspect the fuel pump
circuit connections or inspect th ...
 Fuel pump relay inspection
Refer to “electrical components location” in section 0a .
Inspect the fuel pump relay in the following procedures:
remove the frame covers. Refer to “exterior parts
removal and installa ...
Other materials:
Be extra safety-conscious on bad weather days
Riding on bad weather days,
especially wet ones, requires
extra caution. Braking distances
increase on a rainy day. Stay off
the painted surface marks, manhole
covers, and greasy-appearing
areas, as they can be
especially slippery. Use extra caution
at railway crossings and on
metal grating ...
Lubrication points
Proper lubrication is important for
smooth operation and long life of
each working part of your motorcycle
and also for safe riding. It is
a good practice to lubricate the
motorcycle after a long rough ride
and after getting it wet it in the
rain or after washing it. Major
lubrication points ...
Fuel pressure inspection
Keep away from fire or spark.
Spilled gasoline should be wiped off
immediately.
Work in a well-ventilated area.
Inspect the fuel pressure in the following procedures:
lift and support the fuel tank. Refer to “fuel tank removal and
installati ...