Suzuki GSX-R 1000 Service Manual: Pair system inspection
Pair hose
- Lift and support the fuel tank with the prop stay.
Refer to “fuel tank removal and installation” in section 1g .
- Remove the air cleaner box. Refer to “air cleaner box removal and installation” in section 1d .
- Inspect the pair hoses for wear or damage. If it is worn or damaged, replace the pair hose with a new one. Refer to “pair system hose routing diagram” .
- Reinstall the removed parts.
Pair reed valve
- Remove the pair reed valves. Refer to “pair reed valve removal and installation” .
- Inspect the reed valves for carbon deposit.
If carbon deposit is found on the reed valve, replace the pair reed valve with a new one.
- Reinstall the pair reed valves. Refer to “pair reed valve removal and installation” .
Pair control solenoid valve
| Note pair control solenoid valve can be checked without removing it from the motorcycle. Refer to “dtc “c49” (p1656): pair control solenoid valve circuit malfunction” in section 1a . |
- Remove the pair control solenoid valve. Refer to “pair control solenoid valve removal and installation” .
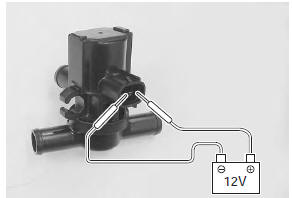
- Check that air flows through the air inlet port to the air outlet ports. If air does not flow out, replace the pair control solenoid valve with a new one.
- Connect the 12 v battery to the pair control solenoid valve terminals and check the air flow. If air does not flow out, the solenoid valve is in normal condition.
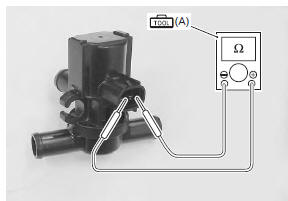
- Check the resistance between the terminals of the pair control solenoid valve.
Special tool
 (a): 09900–25008 (multi circuit
tester set)
Tester knob indication resistance (Ω)
Pair control solenoid valve resistance 20 – 24 Ω at 20 – 30 °c (68 – 86 °f)
- Reinstall the pair control solenoid valve. Refer to “pair control solenoid valve removal and installation” .
 Pair control solenoid valve removal and
installation
Pair control solenoid valve removal and
installation
Removal
Lift and support the fuel tank with the prop stay.
Refer to “fuel tank removal and installation” in section 1g .
Remove the air cleaner box. Refer to “air cleaner box removal and ...
 Crankcase breather (pcv) hose inspection
Inspect the crankcase breather (pcv) hose in the
following procedures:
lift and support the fuel tank with the prop stay.
Refer to “fuel tank removal and installation” in section 1g .
& ...
Other materials:
Exhaust control system operation
The excs is operated by the signal supplied from the ecm. The open/close
operation of the excv is performed by
the excva which is controlled by the ecm by changing the current direction of
the actuator motor. The position
sensor (incorporated in the excva) detects the excva movement by measuri ...
Country and area codes
The following codes stand for the applicable country(-ies) and area(-s).
Wire color symbols
Warning, caution and information labels location
Noise label
Information label
Vacuum hose routing label
Fuel information label
Manual notice label
Screen la ...
Spring pre-load adjustment
To change the spring pre-load,
turn the adjuster 1 clockwise or
counterclockwise. Turning the
adjuster clockwise will increase
the spring pre-load. Turning the
adjuster counterclockwise will
decrease the spring pre-load.
There are five grooved lines on
the side of the adjuster 1 for re ...