Suzuki GSX-R 1000 Service Manual: Ap sensor removal and installation
Removal
- Remove the front seat. Refer to “exterior parts removal and installation” in section 9d (page 9d- 6).
- Disconnect the starter relay (1) from the holder.
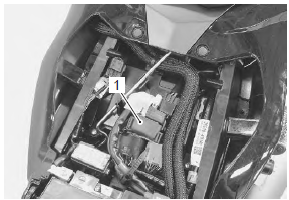
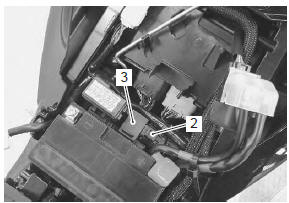
- Disconnect the coupler (2) and remove the ap sensor (3).
Installation
Install the ap sensor in the reverse order of removal.
To sensor inspection
Refer to “dtc “c23” (p1651-h/l): to sensor circuit malfunction” in section 1a .
 Iat sensor inspection
Refer to “dtc “c21” (p0110-h/l): iat sensor circuit malfunction” in section
1a .
Inspect the iat sensor.
Note
iat sensor resistance measurement method
is the same way as that of the ...
 To sensor removal and installation
Removal
Remove the ap sensor. Refer to “ap sensor removal and installation” .
Disconnect the coupler (1) and remove the to
sensor (2).
Installation
Install the to sensor in the r ...
Other materials:
Drive chain adjustment
Inspect the drive chain slack
before each use of the motorcycle.
Place the motorcycle on the
side stand. The drive chain
should be adjusted for 20 - 30
mm (0.8 - 1.2 In) of slack, as
shown.
Warning
Too much chain slack can
cause the chain to come off the
sprockets, resul ...
DTC “c41” (p0230-h/l): fp relay circuit
malfunction
Detected condition and possible cause
Detected condition
Possible cause
C41
No voltage is applied to fuel pump.
Fuel pump relay circuit open or short.
Fuel pump relay malfunction.
Fuel pump relay switch circuit is shorted to power
source.
...
Regulator / rectifier removal and installation
Removal
Turn the ignition switch off.
Remove the right side cowling. Refer to “exterior parts removal and
installation” in section 9d .
Lift and support the fuel tank. Refer to “fuel tank
removal and installation” in section 1g (page 1g-
9).
Remove the evap system purge ...