Suzuki GSX-R 1000 Service Manual: To sensor removal and installation
Removal
- Remove the ap sensor. Refer to “ap sensor removal and installation” .
- Disconnect the coupler (1) and remove the to sensor (2).

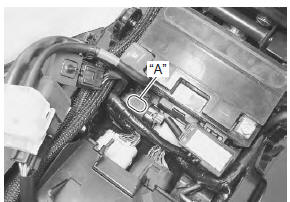
Installation
Install the to sensor in the reverse order of removal.
Pay attention to the following point:
- when installing the to sensor, bring the “up” letters “a” upward.
Stp sensor inspection
Refer to “dtc “c29” (p1654-h/l): secondary throttle position sensor (stps) circuit malfunction” in section 1a .
 Ap sensor removal and installation
Removal
Remove the front seat. Refer to “exterior parts
removal and installation” in section 9d (page 9d-
6).
Disconnect the starter relay (1) from the holder.
Disconnect the ...
 Stp sensor adjustment
Adjust the stp sensor in the following procedures:
remove the air cleaner box cover. Refer to “air cleaner element removal
and installation” in section 1d .
Disconnect the stva lead wir ...
Other materials:
Inspecting the drive chain
When inspecting the chain, look
for the following:
loose pins
damaged rollers
dry or rusted links
kinked or binding links
excessive wear
improper chain adjustment
If you find anything wrong with the
drive chain condition or adjustment,
correct the pr ...
Engine coolant temperature indicator light inspection
Inspect the engine coolant temperature meter and indicator light (led) in the
following procedures:
remove the left side cowling. Refer to “exterior parts removal and
installation” in section 9d .
Disconnect the ect sensor coupler (1).
Connect a variable resistor (2) ...
Heated oxygen sensor (ho2s) removal and
installation
Removal
Do not
remove the ho2 sensor while it is hot.
Caution
be careful not to expose the ho2 sensor to
excessive shock.
Do not use an impact wrench when
removing or installing the ho2 sensor.
Be careful not to twist or damage t ...