Suzuki GSX-R 1000 Service Manual: Front brake caliper disassembly and assembly
Refer to “front brake caliper removal and installation” .
| Note the right and left calipers are installed symmetrically and therefore the disassembly procedure for one side is the same as that for the other side. |
Disassembly
- Remove the brake pads (1) and spring from the caliper by removing the pad mounting pins.
- Place a rag over the pistons to prevent them from popping out and then force out the pistons using compressed air.
| Caution do not use high pressure air to prevent piston damage. |
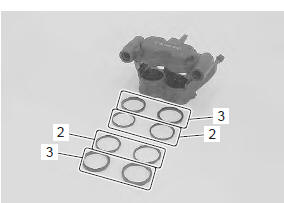
- Remove the dust seals (2) and piston seals (3) from both sides of the caliper.
Assembly
Assemble the caliper in the reverse order of disassembly. Pay attention to the following points:
- wash the caliper bores and pistons with specified brake fluid. Particularly wash the dust seal grooves and piston seal grooves.
Bf: brake fluid (dot 4)
Caution
|
- Apply the brake fluid to piston seals (1) and dust seals (2).
| Caution replace the piston seals (1) and dust seals (2) with new ones. |
Bf: brake fluid (dot 4)
- Install the piston seals as shown in the figure.Install the piston seals as shown in the figure.
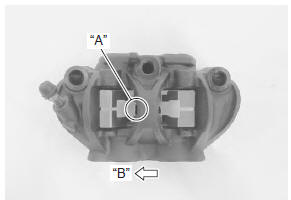
- When installing the spring to the caliper, bring its wider pawl “a” facing top side.
|
- Install the brake pads and temporarily tighten the pad mounting pins (3).
 Front brake caliper removal and installation
Note
the right and left calipers are installed
symmetrically and therefore the removal
procedure for one side is the same as that for
the other side.
Removal
Drain brake f ...
 Front brake caliper parts inspection
Refer to “front brake caliper disassembly and assembly” .
Brake caliper cylinder
Inspect the brake caliper cylinder wall for nicks,
scratches or other damage. If any damage is found,
replace the c ...
Other materials:
Gearshift lever height inspection and
adjustment
Inspect and adjust the gearshift lever height in the
following procedures:
inspect the gearshift lever height “a” between the
lever top and footrest.
Adjust the gearshift lever height if necessary.
Gearshift lever height “a”
standard: 65 – 75 mm (2.6 – 3.0 In)
Loosen the l ...
Starter motor will not run
Note
make sure the fuses are not blown and the battery is fully-charged
before diagnosing.
Troubleshooting
Step
Action
Yes
No
1
Shift the transmission into neutral.
Grasp the clutch lever, turn on the ignition switch ...
Gearshift shaft / gearshift cam plate components
Gearshift shaft
Gearshift cam drive plate
Gearshift cam plate
Gearshift cam stopper
19 N·m (1.9 Kgf-m,
13.5 Lbf-ft)
13 N·m
(1.3 Kgf-m, 9.5 Lbf-ft)
8.5 N·m
(0.85 Kgf-m, 6.0 Lbf-ft)
Apply grease to oil
seal lip.
Apply thread l ...