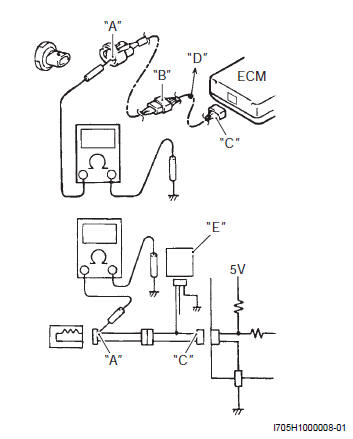
Suzuki GSX-R 1000 Service Manual: Short circuit check (wire harness to ground)
- Disconnect the negative (–) cable from the battery.
- Disconnect the connectors/couplers at both ends of the circuit to be checked.
| Note if the circuit to be checked branches to other parts as shown, disconnect all connectors/ couplers of those parts. Otherwise, diagnosis will be wrong. |
- Measure resistance between terminal at one end of circuit (“a” terminal in figure) and body ground. If continuity is indicated, there is a short circuit to ground between terminals “a” and “c”.
|
- Disconnect the connector/coupler included in circuit (coupler “b”) and measure resistance between terminal “a” and body ground. If continuity is indicated, the circuit is shorted to ground between terminals “a” and “b”.
|
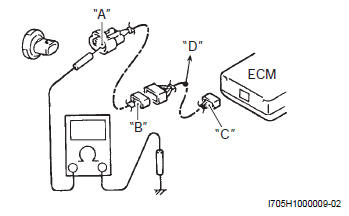
 Voltage check
If voltage is supplied to the circuit being checked, voltage
check can be used as circuit check.
With all connectors/couplers connected and voltage
applied to the circuit being checked, m ...
 Using the multi-circuit testers
Use the suzuki multi-circuit tester set.
Use well-charged batteries in the tester.
Be sure to set the tester to the correct testing range.
Special tool
(A): 09900–25008
(multi ...
Other materials:
Brake system inspection
Inspect brake system
initially at 1 000 km (600 miles, 2 months) and every
6 000 km (4 000 miles, 12 months) thereafter
Inspect brake hose and brake fluid
every 6 000 km (4 000 miles, 12 months)
The brake system of this motorcycle is
filled with a glycol-based brake flui ...
General description
Engine coolant description
Caution
use a high quality ethylene glycol base
anti-freeze, mixed with distilled water. Do
not mix an alcohol base anti-freeze and
different brands of anti-freeze.
Do not put in more than 60% anti-freeze or
less than 50%. (Refer ...
Side stand
An interlock switch is provided to
cut off the ignition circuit when the
side stand is down and the transmission
is in any gear other than
neutral.
The side stand/ignition interlock
switch works as follows:
if the side stand is down and
the transmission is in gear, the
engine ...