Suzuki GSX-R 1000 Service Manual: Voltage check
If voltage is supplied to the circuit being checked, voltage check can be used as circuit check.
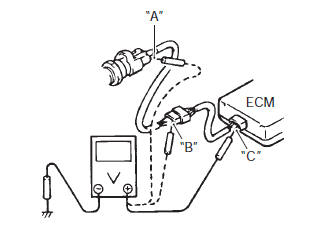
- With all connectors/couplers connected and voltage applied to the circuit being checked, measure voltage between each terminal and body ground.
- If measurements were taken as shown in the figure and results were listed in the following, it means that the circuit is open between terminals “a” and “b”.
Voltage between
“a” and body ground: approx. 5 V
“b” and body ground: approx. 5 V
“c” and body ground: 0 V
- Also, if measured values are as listed following, a resistance (abnormality) exists which causes the voltage drop in the circuit between terminals “a” and “b”.
Voltage between
“a” and body ground: approx. 5 V
“b” and body ground: approx. 5 V – 2 v voltage
drop
“c” and body ground: 3 v – 2 v voltage drop

 Continuity check
Measure resistance across coupler “b” (between “a”
and “c” in figure).
If no continuity is indicated (infinity or over limit), the
circuit is open between terminals “a” and “c”.
Dis ...
 Short circuit check (wire harness to ground)
Disconnect the negative (–) cable from the battery.
Disconnect the connectors/couplers at both ends of
the circuit to be checked.
Note
if the circuit to be checked branches t ...
Other materials:
Front brake hose removal and installation
Removal
Drain brake fluid. Refer to “brake fluid replacement” .
2) Remove the front brake hoses as shown in the front brake hose routing
diagram. Refer to “front brake hose routing diagram” .
Installation
Caution
the seal washers should be replaced with the
new ones to pr ...
Tire pressure and loading
Proper tire pressure and proper
tire loading are important factors.
Overloading your tires can lead to
tire failure and loss of vehicle control.
Check tire pressure each day
before you ride, and be sure the
pressure is correct for the vehicle
load according to the table below.
Tire pre ...
Fuel pump disassembly and assembly
Disassembly
Remove the fuel tank. Refer to “fuel tank removal and installation” .
Remove the fuel pump assembly (1) by removing its
mounting bolts diagonally.
Spilled gasoline should be wipe off
immediately.
Keep away from fire or spark.
Work in a wel ...