Suzuki GSX-R 1000 Service Manual: Swingarm removal and installation
Removal
- Cut the drive chain. Refer to “drive chain replacement” in section 3a .
- Remove the rear wheel assembly. Refer to “rear wheel assembly removal and installation” in section 2d .
- Disconnect the rear brake hose from the brake hose clamp (1).
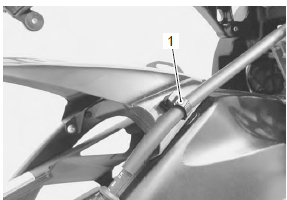
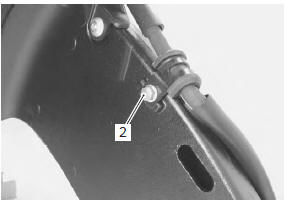
- Remove the brake hose clamp bolt (2).
- Remove the rear brake caliper from the swingarm.
- Remove the left muffler and muffler chamber heat guard no. 2. Refer to “muffler / muffler chamber / exhaust pipe removal and installation” in section 1k .
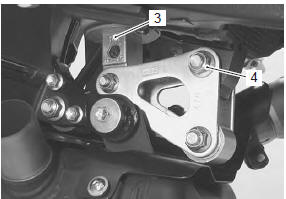
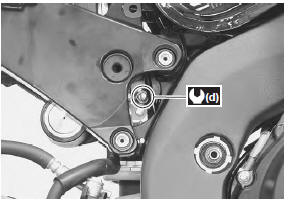
- Remove the rear shock absorber (3) and cushion lever mounting bolt and nut (4). Refer to “rear shock absorber removal and installation” and “cushion lever removal and installation” .
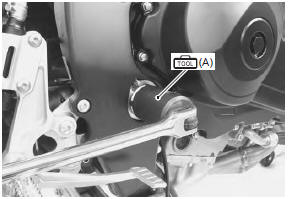
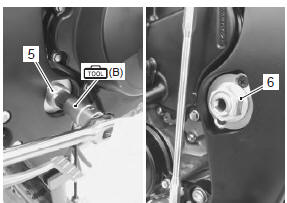
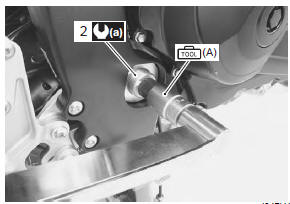
- Remove the swingarm pivot shaft lock-nut with the special tool.
Special tool
 (a): 09940–14940 (swingarm pivot
thrust
adjuster wrench)
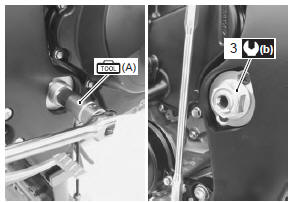
- Hold the swingarm pivot shaft (5) with the special tool and remove the swingarm pivot nut (6).
Special tool
 (b): 09944–28321 (hexagon socket
(19
mm))
- Remove the swingarm pivot shaft.
- Remove the swingarm assembly.
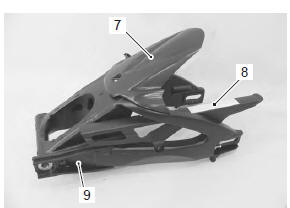
- Remove the mudguard (7), chain case (8) and chain buffer (9) from the swingarm.
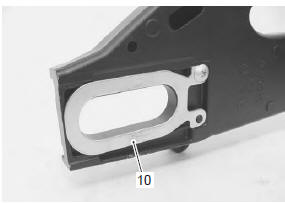
- Remove the plate (10).
Installation
Install the swingarm in the reverse order of removal. Pay attention to the following points:
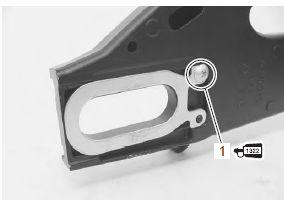
- install the plate.
| Note when reusing the removed screw (1), apply a small quantity of the thread lock to it. |
 : Thread lock cement
99000–32110
(thread lock cement super “1322” or
equivalent)
- Adjust swingarm pivot thrust clearance in the following procedures:
– insert the swingarm pivot shaft (2) and tighten it to the specified torque with the special tool.
Special tool
 (a): 09944–28321 (hexagon socket
(19
mm))
Tightening torque swingarm pivot shaft (a): 15 n·m (1.5 Kgf-m, 11.0 Lbf-ft)
– Hold the swingarm pivot shaft with the special tool and tighten the swingarm pivot nut (3) to the specified torque.
Special tool
 (a): 09944–28321 (hexagon socket
(19
mm))
Tightening torque swingarm pivot nut (b): 100 n·m (10.0 Kgf-m, 72.5 Lbf-ft)
– Tighten the swingarm pivot lock-nut (4) to the specified torque with the special tool.
Special tool
 (b): 09940–14940 (swingarm pivot
thrust
adjuster wrench)
Tightening torque swingarm pivot lock-nut (c): 90 n·m (9.0 Kgfm, 65.0 Lbf-ft)

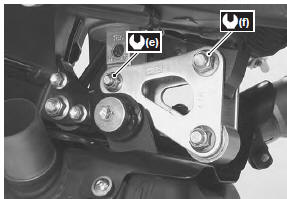
- Tighten the cushion lever, cushion rod and rear shock absorber mounting bolts and nuts to the specified torque.
Tightening torque rear shock absorber upper mounting nut (d): 50 n·m (5.0 Kgf-m, 36.0 Lbf-ft) rear shock absorber lower mounting nut (e): 50 n·m (5.0 Kgf-m, 36.0 Lbf-ft) cushion lever mounting nut (f): 98 n·m (9.8 Kgfm, 71.0 Lbf-ft)
 Cushion rod bearing removal and installation
Removal
Remove the cushion rod. Refer to “cushion rod removal and installation”
.
Remove the cushion rod bearing with the special
tool.
Special tool
(a):
09921–20240 (bearing re ...
 Swingarm pivot boss removal and installation
Removal
Remove the swingarm. Refer to “swingarm removal and installation” .
Remove the swingarm pivot boss nut (1).
Note
remove the swingarm pivot boss only when
replacing ...
Other materials:
Water hose removal and installation
Removal
Remove the side cowlings. Refer to “exterior parts
removal and installation” in section 9d (page 9d-
6).
Drain engine coolant. Refer to “cooling system inspection” in section
0b .
Lift and support the fuel tank. Refer to “fuel tank
removal and installation” in se ...
Modification
Modification of the motorcycle, or
removal of original equipment
may render the vehicle unsafe or
illegal. Obey all applicable equipment
regulations in your area.
The frame of this motorcycle is
made of an aluminum alloy.
Therefore, never make any modifications
such as drilling or weldin ...
DTC “c40” (p0505 / p0506 / p0507): isc
valve circuit malfunction
Detected condition and possible cause
Detected condition
Possible cause
C40/P0505
The circuit voltage of motor drive is
unusual.
Isc valve circuit open or shorted to ground.
Air passage clogged.
Isc valve is fixed.
Isc valve prese ...