Suzuki GSX-R 1000 Service Manual: Diagnostic information and procedures
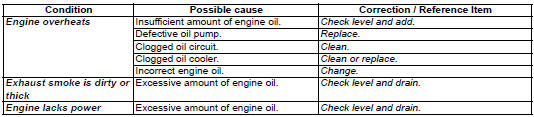
Engine lubrication symptom diagnosis
Oil pressure check
Check the engine oil pressure periodically. This will give a good indication of the condition of the moving parts.
| Note before checking the oil pressure, check the following.
|
- Start the engine and check if the oil pressure indicator light is turned on. If the light stays on, check the oil pressure indicator light circuit. If the circuit is ok, check the oil pressure in the following manner.
- Remove the left side cowling. Refer to “exterior parts removal and installation” in section 9d .
- Remove the oil pressure switch lead wire (1) and oil pressure switch (2).
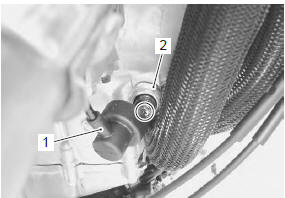
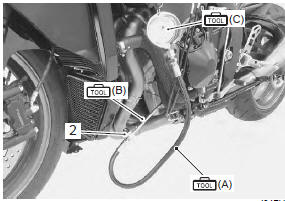
- Install the special tools to the mounting hole of the oil pressure switch.
Special tool (a): 09915–74521 (adapter hose) (b): 09915–17410 (oil pressure gauge adapter) (c): 09915–77331 (oil pressure gauge (1000 kpa))
- Install the oil pressure switch (2) to the adapter.
- Warm up the engine as follows: summer: 10 min. At 2 000 r/min winter: 20 min. At 2 000 r/min
- after warming up, increase the engine speed to 3
000 r/min (observe the tachometer), and read the oil
pressure gauge.
If the oil pressure is lower or higher than the specification, the following causes may be considered.
Oil pressure specification 100 – 400 kpa (1.0 – 4.0 Kgf/cm2, 14 – 57 psi) at 3 000 r/min, oil temp. 60 °C (140 °f)
|
High oil pressure |
Low oil pressure |
|
|
- Stop the engine and remove the oil pressure gauge and attachment.
- Reinstall the oil pressure switch. Refer to “oil pressure switch removal and installation” .
- Check the engine oil level. Refer to “engine oil and filter replacement” in section 0b .
- Install the left side cowling. Refer to “exterior parts removal and installation” in section 9d (page 9d- 6).
 Schematic and routing diagram
Engine lubrication system chart diagram
Engine lubrication circuit diagram
...
 Repair instructions
Engine oil and filter replacement
Refer to “engine oil and filter replacement” in section 0b .
Engine oil level inspection
Refer to “engine oil and filter replacement” in section 0b . ...
Other materials:
Diagnostic information and procedures
Drive chain and sprocket symptom diagnosis
Condition
Possible cause
Correction / reference item
Noisy drive chain
Worn sprocket
Replace
Worn drive chain
Replace
Stretched drive chain
Replace
Too large drive chain slack
Adju ...
Emission control warranty
Suzuki motor corporation warrants
to the ultimate purchaser
and each subsequent purchaser
that this vehicle is designed, built,
and equipped so as to conform at
the time of sale with all U.S. Emission
standards applicable at the
time of manufacture, and that it is
free from defects in materi ...
Radiator cap inspection
Inspect the radiator cap in the following procedures:
remove the radiator cap. Refer to “cooling circuit inspection” .
Attach the radiator cap (1) to the radiator tester (2)
as shown.
Slowly apply pressure to the radiator cap.
If the radiator cap does not hold the pre ...