Suzuki GSX-R 1000 Owners Manual: Brake pad
Front

Rear
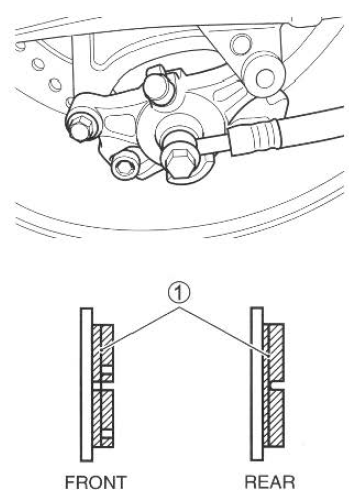
Inspect the front and rear brake pads to see if they are worn down to the grooved wear limit line 1. If a pad is worn to the grooved wear limit line, it must be replaced with a new one. After replacing either the front or rear brake pads, the brake lever or pedal must be pumped several times. This will extend the pads to their proper position.
 Warning Warning
Inspect brake pad wear before each use. Ask your suzuki dealer or qualified mechanic to replace brake pads if any pad is worn to the limit. |
| Warning
Before riding, "pump" the brake repeatedly until brake pads are pressed against the brake disks and proper lever/ pedal stroke and firm feel are restored. |
Note
: do not squeeze/depress the brake lever/pedal when the pads are not in their positions. It is difficult to push the pistons back and brake fluid leakage may result.
 Brake fluid
Check the brake fluid level in both front and rear brake fluid reservoirs. If
the level in either reservoir is below the lower mark, inspect for brake pad
wear and leaks.
Warning
Br ...
 Rear brake pedal adjustment
The rear brake pedal position
must be properly adjusted at all
times or the disk brake pads will
bear against the disk causing
damage to the pads and to the
disk surface. Adjust the brake
pedal ...
Other materials:
Camshaft inspection
Refer to “engine top side disassembly” .
Refer to “engine top side assembly” .
Camshaft identification
The exhaust camshaft has the embossed letters “ex”
and the intake camshaft has the embossed letters “in”.
Cam wear
Check the camshaft for wear or damage.
Measure the cam height “a” w ...
Camshaft sprocket
Inspect the camshaft sprocket in the following
procedures:
remove the intake and exhaust camshafts. Refer to “engine top side
disassembly” .
Inspect the teeth of each camshaft sprocket for wear
or damage.
If they are worn or damaged, replace the sprocket/
camshaft assembl ...
Noise emission control system description
Tampering with the noise control system prohibited: local law or federal law
prohibits the following
acts or the causing thereof:
the removal or rendering inoperative by any person, other than for
purposes of maintenance, repair or
replacement, of any device or element of design in ...