
Suzuki GSX-R 1000 Owners Manual: Rear brake pedal adjustment
The rear brake pedal position must be properly adjusted at all times or the disk brake pads will bear against the disk causing damage to the pads and to the disk surface. Adjust the brake pedal posit~ on in the following manner:
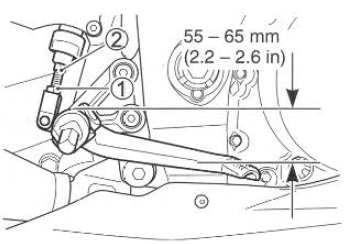
- Loosen lock nut 1, and turn the push rod 2 to locate the pedal 55 - 65 mm (2.2 - 2.6 In) below the top face of the footrest.
- Retighten lock nut 1 to secure push rod 2 in the proper position.
|
Caution An incorrectly adjusted brake pedal may force brake pads to rub against the disk at all times, causing damage to the pads and disk. Follow the steps in this section to adjust the brake pedal properly. |
 Brake pad
Front
Rear
Inspect the front and rear brake
pads to see if they are worn down
to the grooved wear limit line 1. If
a pad is worn to the grooved wear
limit line, it must be replaced with
...
 Rear brake light switch
To adjust the brake light switch,
hold the switch body and turn the
adjuster so that the brake light will
come on just before a pressure
rise is felt when the brake pedal is
depressed. ...
Other materials:
Self-diagnostic procedures
Use of mode select switch
Note
do not disconnect the coupler from ecm,
battery cable from battery, ecm ground
wire from engine or main fuse before
confirming dtc (diagnostic trouble code)
stored in memory. Such disconnection
may erase memorized information in ec ...
Crankcase emission control system
description
The engine is equipped with a pcv system to prevent discharging crankcase
emissions into the atmosphere. Blow-by
gas in the engine is constantly drawn into the crankcase, which is returned to
the combustion chamber through the
pcv (breather) hose, air cleaner and throttle body.
...
Thermostat removal and installation
Removal
Drain a small amount of engine coolant. Refer to “cooling system
inspection” in section 0b .
Lift and support the fuel tank. Refer to “fuel tank
removal and installation” in section 1g (page 1g-
9).
Remove the thermostat cover (1).
Remove the thermostat ( ...