Suzuki GSX-R 1000 Service Manual: Rear brake master cylinder disassembly and assembly
Refer to “rear brake master cylinder assembly removal and installation” .
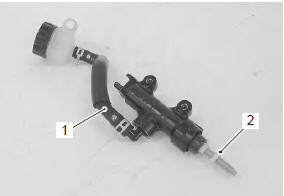
Disassembly
- Disconnect the reservoir hose (1).
- Remove the lock-nut (2).
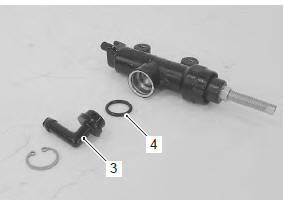
- Remove the brake hose connector (3) and o-ring (4).
Special tool
 : 09900–06108 (snap ring remover
(close
type))
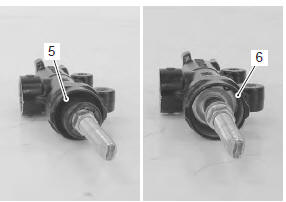
- Pull out the dust boot (5) and remove the snap ring (6).
Special tool
 : 09900–06108 (snap ring remover
(close
type))
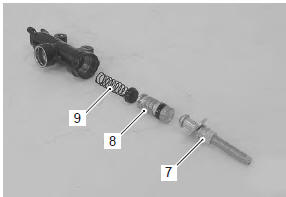
- Remove the push rod (7), piston/cup set (8) and spring (9).
Assembly
Assemble the master cylinder in the reverse order of disassembly. Pay attention to the following points:
Caution
|
Bf: brake fluid (dot 4)
- Apply grease to the push rod end.
 : Grease 99000–25100 (suzuki
silicone
grease or equivalent)
| Caution replace the o-ring with a new one. |
 Rear brake master cylinder assembly removal and installation
Refer to “rear brake hose routing diagram” (page 4a-
2).
Removal
Remove the right side frame cover. Refer to “exterior parts removal and
installation” in section 9d .
Remove the rear ...
 Rear brake master cylinder parts inspection
Refer to “rear brake master cylinder disassembly and assembly” .
Master cylinder
Inspect the master cylinder bore for any scratches or
other damage.
Piston / rubber parts
Inspect the piston s ...
Other materials:
Special tools and equipment
Recommended service material
Note
required service material is also described in the following.
“Throttle body components” “engine bottom side assembly”
Special tool
...
Idle speed
Adjust the engine idle speed periodically on the engine at normal operating
temperature.
To adjust the idle speed:
Lift the fuel tank by referring to
the air cleaner section.
Start the engine and warm it
up by running at idling speed
for 10 minutes in summer
(where ambie ...
DTC “c49” (p1656): pair control solenoid
valve circuit malfunction
Detected condition and possible cause
Detected condition
Possible cause
Pair control solenoid valve voltage is not input to ecm
Pair control solenoid valve circuit open or short.
Pair control solenoid valve malfunction.
Ecm malfunction.
...