
Suzuki GSX-R 1000 Owners Manual: Drive chain adjustment
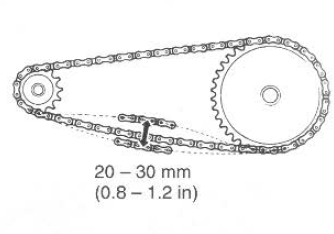
Inspect the drive chain slack before each use of the motorcycle.
Place the motorcycle on the side stand. The drive chain should be adjusted for 20 - 30 mm (0.8 - 1.2 In) of slack, as shown.
 Warning Warning
Inspect and adjust the drive chain slack before each use. |
To adjust the drive chain, follow the procedure below:
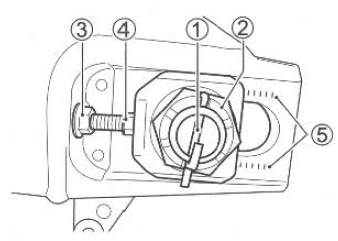
- Place the motorcycle on the side stand.
- Remove the cotter pin 1.
- Loosen the axle nut 2.
- Loosen the lock nut 3 (right and left).
| Warning
The muffler will be hot enough to burn you for some time after stopping the engine. Wait until the muffler cools to avoid burns. |
- Turn the right and left adjuster bolts 4 until the chain has 20 - 30 mm (0.8 - 1.2 In) of slack halfway between the engine sprocket and rear sprocket.
- At the same time that the chain is being adjusted, the rear sprocket must be kept in perfect alignment with the front sprocket. To assist you in performing this procedure, there are reference marks 5 on the swingarm and each chain adjuster which are to be aligned with each other and to be used as a reference from one side to the other.
- Tighten the lock nut 3 (right and left).
- Tighten the axle nut ~ securely.
- Replace the cotter pin with a new one.
- Recheck the chain slack after tightening and readjust if necessary.
Rear axle nut tightening torque: 100 n·m (1 0.0 Kgf-m, 72.5 Lb-ft)
Note
: do not adjust the drive chain beyond the adjustable range 5. Replace the drive chain before drive chain exceeds the limit.
 Drive chain cleaning and
oiling
Drive chain cleaning and
oiling
Clean and oil the chain as follows:
Wash the chain with kerosene.
Kerosene will lubricate and
clean the chain.
Warning
Kerosene can be hazardous .
Kerosene is flammable. ...
 Brakes
This motorcycle has front and
rear disk brakes.
Warning
Failure to inspect and properly
maintain the brakes increases
your chance of having an accident.
Inspect the brake system
...
Other materials:
Generator removal and installation
Removal
Drain engine oil. Refer to “engine oil and filter replacement” in
section 0b .
Remove the left side cowling. Refer to “exterior parts removal and
installation” in section 9d .
Disconnect the generator coupler (1).
Remove the generator cover (2).
...
Clutch installation
Install the primary driven gear assembly (1).
Caution
if it is difficult to install the primary driven
gear, rotate the crankshaft.
Be sure to engage the oil pump drive
sprocket with the primary driven gear.
Install the spacer (2) and bea ...
Starter button inspection
Inspect the starter button in the following procedures:
remove the air cleaner box. Refer to “air cleaner box removal and
installation” in section 1d .
Disconnect the right handlebar switch coupler (1).
Inspect the starter button for continuity with the
tester.
If ...