Suzuki GSX-R 1000 Service Manual: Pair reed valve removal and installation
Removal
- Lift and support the fuel tank with the prop stay.
Refer to “fuel tank removal and installation” in section 1g .
- Remove the air cleaner box. Refer to “air cleaner box removal and installation” in section 1d .
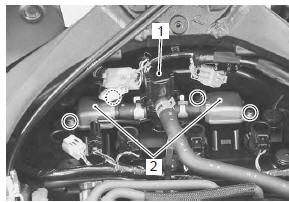
- Remove the pair control solenoid valve (1) along with the pair reed valve covers (2). Refer to “pair control solenoid valve removal and installation” .
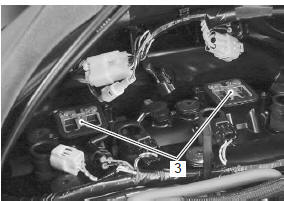
- Remove the pair reed valves (3).
Installation
Install the pair reed valve in the reverse order of removal. Pay attention to the following points:
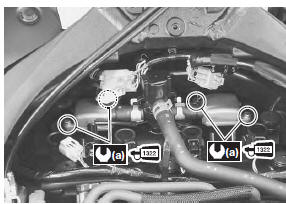
- apply thread lock to the pair reed valve cover bolts and tighten them to the specified torque.
 : Thread lock cement
99000–32110
(thread lock cement super “1322” or
equivalent)
Tightening torque pair reed valve cover bolt (a): 10 n·m (1.0 Kgf-m, 7.0 Lbf-ft)
 Heated oxygen sensor (ho2s) removal and
installation
Heated oxygen sensor (ho2s) removal and
installation
Removal
Do not
remove the ho2 sensor while it is hot.
Caution
be careful not to expose the ho2 sensor to
excessive shock.
Do not use an impact ...
 Pair control solenoid valve removal and
installation
Pair control solenoid valve removal and
installation
Removal
Lift and support the fuel tank with the prop stay.
Refer to “fuel tank removal and installation” in section 1g .
Remove the air cleaner box. Refer to “air cleaner box removal and ...
Other materials:
Starter button inspection
Inspect the starter button in the following procedures:
remove the air cleaner box. Refer to “air cleaner box removal and
installation” in section 1d .
Disconnect the right handlebar switch coupler (1).
Inspect the starter button for continuity with the
tester.
If ...
Engine assembly installation
Install the engine in the reverse order of engine removal.
Pay attention to the following points:
before installing the engine, install the collars (1).
Before installing the engine, install the engine
mounting thrust adjusters (2).
Gradually raise the rear side of ...
Balancer shaft journal bearing inspection
and selection
Refer to “engine bottom side disassembly” (page 1d-
49).
Refer to “engine bottom side assembly” .
Inspection
Inspect the bearing surfaces for any signs of fusion,
pitting, burn or flaws. If any, replace them with a
specified set of bearings.
Selection
Place the plastigauge axial ...