Suzuki GSX-R 1000 Service Manual: Drive chain inspection and adjustment
Inspect drive chain initially at 1 000 km (600 miles, 2 months) and every 6 000 km (4 000 miles, 12 months) thereafter
Drive chain visual check
- With the transmission in neutral, support the motorcycle using a jack and turn the rear wheel slowly by hand.
- Visually check the drive chain for the possible defects listed as follows. If any defects are found, the drive chain must be replaced. Refer to “drive chain replacement” in section 3a .
- Loose pins
- damaged rollers
- dry or rusted links
- kinked or binding links
- excessive wear
- improper chain adjustment
- missing o-ring seals
| Note when replacing the drive chain, replace the drive chain and sprockets as a set. |
|
Drive chain length inspection
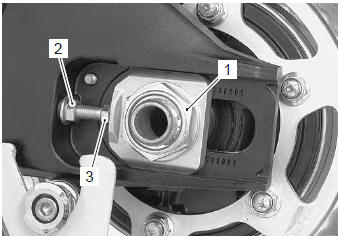
- Loosen the axle nut (1).
- Loosen the left and right chain adjuster lock-nuts (2).
- Give tension to the drive chain fully by turning both chain adjuster bolts (3).
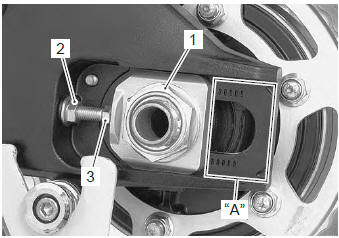
- Count out 21 pins (20 pitches) on the chain and measure the distance between the two points. If the distance exceeds the service limit, the chain must be replaced.
Drive chain 20-pitch length service limit: 319.4 Mm (12.57 In)
- After finishing the drive chain length inspection, adjust the drive chain slack.
Drive chain slack adjustment
- Support the motorcycle with a jack.
- Loosen the axle nut (1).
- Loosen the left and right chain adjuster lock-nuts (2).
- Loosen or tighten both chain adjuster bolts (3) until there is 20 – 30 mm (0.8 – 1.2 In) of slack “a” at the middle of the chain between the engine and rear sprockets as shown in the figure.
 Caution Caution
|
Drive chain slack “a” standard: 20 – 30 mm (0.8 – 1.2 In)

- After adjusting the drive chain, tighten the axle nut (1) to the specified torque.
Tightening torque rear axle nut: 100 n·m (10.0 Kgf-m, 72.5 Lbf-ft)
- Tighten both chain adjuster lock-nuts (2) securely.
- Recheck the drive chain slack after tightening the axle nut.
 Clutch cable play inspection and adjustment
Inspect clutch cable play
every 6 000 km (4 000 miles, 12 months)
Inspect and adjust the clutch cable play “a” as follows.
Clutch cable play “a”
10 – 15 mm (0.4 – 0.6 In)
Lift and support ...
 Drive chain cleaning and lubricating
Clean and lubricate drive chain
every 1 000 km (600 miles)
Clean and lubricate the drive chain in the following
procedures:
clean the drive chain with kerosine. If the drive chain
tends ...
Other materials:
Battery charging
Initial charging
filling electrolyte
Note
when filling electrolyte, the battery must be
removed from the vehicle and must be put on
the level ground.
Remove the aluminum tape (1) which seals the
battery filler holes “a”.
Remove the caps (2) from the electrolyte ...
Cam chain guide inspection
Inspect the cam chain guide in the following procedures:
remove the cam chain guides. Refer to “cam chain guide / cam chain
tensioner removal and installation” .
Check the contacting surface of the cam chain
guides. If it is worn or damaged, replace it with a new
one.
...
Gearshift shaft / gearshift cam plate components
Gearshift shaft
Gearshift cam drive plate
Gearshift cam plate
Gearshift cam stopper
19 N·m (1.9 Kgf-m,
13.5 Lbf-ft)
13 N·m
(1.3 Kgf-m, 9.5 Lbf-ft)
8.5 N·m
(0.85 Kgf-m, 6.0 Lbf-ft)
Apply grease to oil
seal lip.
Apply thread l ...