Suzuki GSX-R 1000 Service Manual: Clutch cable play inspection and adjustment
Inspect clutch cable play every 6 000 km (4 000 miles, 12 months)
Inspect and adjust the clutch cable play “a” as follows.
Clutch cable play “a” 10 – 15 mm (0.4 – 0.6 In)
- Lift and support the fuel tank. Refer to “fuel tank removal and installation” in section 1g (page 1g- 9).
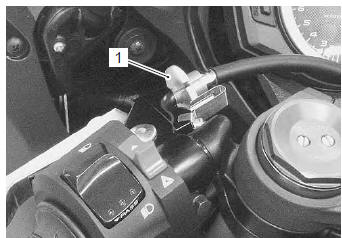
- Turn in the adjuster (1) all the way into the clutch lever assembly.
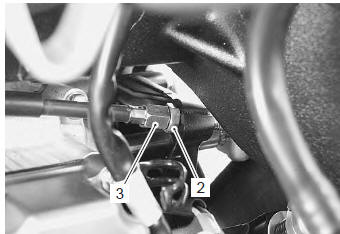
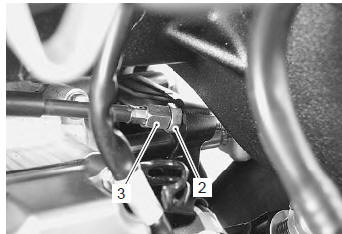
- Loosen the lock-nut (2) and turn the clutch cable adjuster (3) to obtain proper cable play.
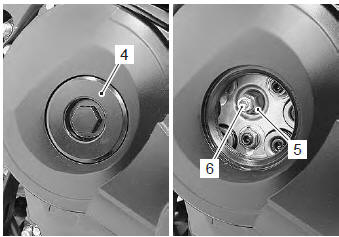
- Remove the clutch release adjuster cap (4).
- Loosen the lock-nut (5) and turn out the clutch release adjusting screw (6) two or three rotations.
- From that position, slowly turn in the clutch release adjusting screw (6) until resistance is felt.
- From this position, turn out the clutch release adjusting screw (6) 1 rotation, and tighten the locknut (5) while holding the screw (6).
Tightening torque clutch release adjusting screw lock-nut: 6 n·m ( 0.6 Kgf-m, 4.5 Lbf-ft)
- Turn the cable adjuster (3) to obtain 10 – 15 mm (0.4 – 0.6 In) of free play “a” at the clutch lever end.
- Tighten the lock-nut (2).
- Install the clutch release adjuster cap (4).
Tightening torque clutch release adjuster cap: 11 n·m (1.1 Kgf-m, 8.0 Lbf-ft)
- Reinstall the fuel tank.
 Cooling system inspection
Inspect cooling system
every 6 000 km (4 000 miles, 6 months)
Replace engine coolant
every 2 years
Engine coolant level inspection
Hold the motorcycle vertically.
Check the engine cool ...
 Drive chain inspection and adjustment
Inspect drive chain
initially at 1 000 km (600 miles, 2 months) and every
6 000 km (4 000 miles, 12 months) thereafter
Drive chain visual check
With the transmission in neutral, support the
m ...
Other materials:
Steering stem bearing removal and installation
Removal
Remove the steering stem upper bearing and steering stem lower bracket.
Refer to “steering / steering damper removal and installation” .
Remove the steering stem lower bearing inner race
using a chisel.
Remove the steering stem upper and lower bearing
races using ...
Oil cooler / oil cooler hose inspection and
cleaning
Refer to “exterior parts removal and installation” in section 9d .
Oil cooler hose inspection
Inspect the oil cooler hoses for any damage and oil
leakage. If any defects are found, replace the oil cooler
hose with a new one.
Oil cooler inspection
Remove the oil cooler guard (1).
...
Rear brake pedal adjustment
The rear brake pedal position
must be properly adjusted at all
times or the disk brake pads will
bear against the disk causing
damage to the pads and to the
disk surface. Adjust the brake
pedal posit~ on in the following
manner:
Loosen lock nut 1, and turn
the push rod 2 to locate t ...