
Suzuki GSX-R 1000 Service Manual: Ect sensor removal and installation
Removal
- Remove the left side cowling. Refer to “exterior parts removal and installation” in section 9d .
- Drain engine coolant. Refer to “cooling system inspection” in section 0b .
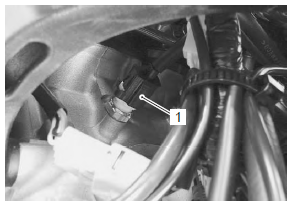
- Disconnect the coupler and remove the ect sensor (1).
| Caution take special care when handling the ect sensor. It may cause damage if it gets an excessive impact. |
Installation
Install the ect sensor in the reverse order of removal.
Pay attention to the following points:
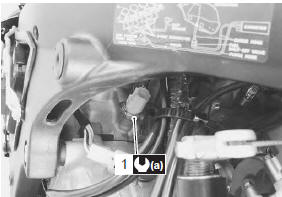
- tighten the ect sensor (1) to the specified torque.
| Caution use new gasket washer to prevent engine coolant leakage. |
Tightening torque ect sensor (a): 18 n·m (1.8 Kgf-m, 13.0 Lbf-ft)
- Pour engine coolant. Refer to “cooling system inspection” in section 0b .
 Tp sensor adjustment
Inspect the tp sensor setting position and adjust it if
necessary in the following procedures:
connect the special tool (mode select switch) to the dealer mode
coupler. Refer to “self-di ...
 Ect sensor inspection
Refer to “dtc “c15” (p0115-h/l): ect sensor circuit malfunction” in section
1a .
Inspect the ect sensor in the following procedures:
remove the ect sensor. Refer to “ect sensor removal ...
Other materials:
Rear wheel related parts inspection
Refer to “rear wheel assembly removal and installation” .
Tire
Refer to “tire inspection” in section 0b .
Rear brake disc
Refer to “rear brake disc inspection” in section 4c .
Wheel damper
Refer to “drive chain related parts inspection” in section 3a .
Sprocket
Refer to “drive chain ...
Fuel pump disassembly and assembly
Disassembly
Remove the fuel tank. Refer to “fuel tank removal and installation” .
Remove the fuel pump assembly (1) by removing its
mounting bolts diagonally.
Spilled gasoline should be wipe off
immediately.
Keep away from fire or spark.
Work in a wel ...
Water pump related parts inspection
Refer to “water pump disassembly and assembly” .
Mechanical seal
Visually inspect the mechanical seal for damage, with
particular attention given to the sealing face.
Replace the mechanical seal that shows indications of
leakage.
Oil seal
Visually inspect the oil seal for damage, with p ...