Suzuki GSX-R 1000 Service Manual: Engine coolant temperature indicator light inspection
Inspect the engine coolant temperature meter and indicator light (led) in the following procedures:
- remove the left side cowling. Refer to “exterior parts removal and installation” in section 9d .
- Disconnect the ect sensor coupler (1).
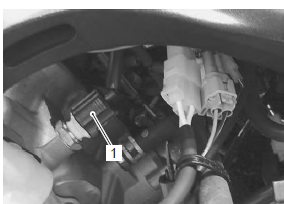
- Connect a variable resistor (2) between the terminals
- Turn the ignition switch on.
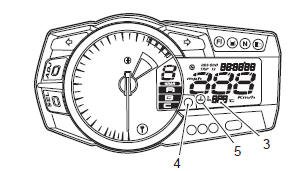
- Check the engine coolant temperature meter (lcd) (3) and indicator
light (led) (4) operations when the
resistance is adjusted to the specified values.
If either one or both indications are abnormal, replace the combination meter assembly with a new one. Refer to “combination meter removal and installation” .

- Connect the ect sensor coupler.
- Install the removed parts.
Ect sensor removal and installation
Refer to “ect sensor removal and installation” in section 1c .
 Combination meter inspection
Led inspection
Check that the leds “a” (fi, fuel, engine rpm, oil
pressure/engine coolant, immobilizer (e-02, 19, 24, 51)
and meter panel illumination) immediately light up when
the ignition switc ...
 Fuel level indicator inspection
If the fuel level indicator light (1) does not function
properly, check the fuel level gauge and its lead wire/
coupler.
If the fuel level gauge and its lead wire/coupler are
functioning properl ...
Other materials:
DTC “c13” (p0105-h/l): iap sensor circuit
malfunction
Detected condition and possible cause
Detected condition
Possible cause
C13
Iap sensor voltage is not within the
following range.
0.5 V ≤ Sensor voltage < 4.85 V
Note
note that atmospheric pressure
varies depending on weather
c ...
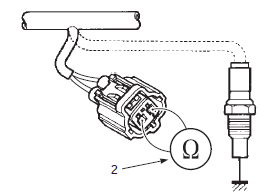
Ect sensor inspection
Refer to “dtc “c15” (p0115-h/l): ect sensor circuit malfunction” in section
1a .
Inspect the ect sensor in the following procedures:
remove the ect sensor. Refer to “ect sensor removal and installation” .
Connect the ect sensor (1) to the circuit tester and
place it in the o ...
Oil cooler / oil cooler hose removal and
installation
Refer to “electrical components location” in section 0a .
Removal
Turn the ignition switch off.
Remove the left side cowling. Refer to “exterior parts removal and
installation” in section 9d .
Drain engine oil. Refer to “engine oil and filter replacement” in
section 0b .
...