Suzuki GSX-R 1000 Service Manual: Rear wheel components
|
 100 N·m (10.0 Kgf-m,
 35 N·m
 60 N·m
 Apply grease
 Apply thread lock to the
 Do not reuse.
 Front wheel dust seal / bearing removal and installation
Removal
Remove the front wheel assembly. Refer to “front wheel assembly removal
and installation” .
Remove the dust seals using the special tool.
Special tool
(a): 09913–50121 (oil ...
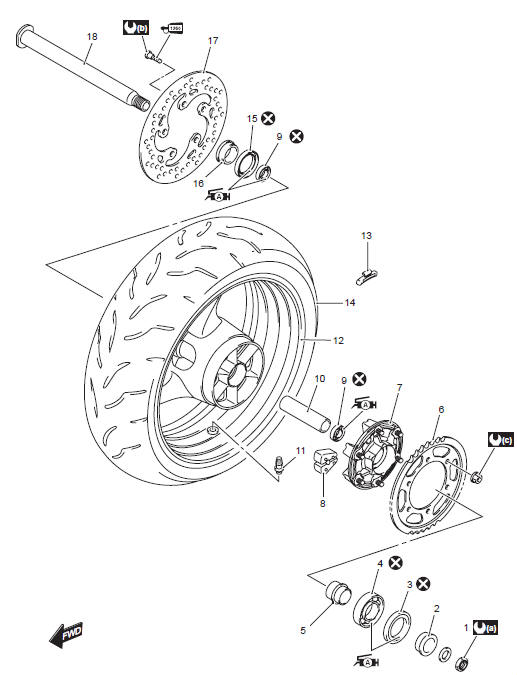
 Rear wheel assembly construction
Rear sprocket nut
Rear axle nut
Brake disc bolt
Clearance
60 N·m (6.0 Kgf-m,
43.0 Lbf-ft)
100 N·m
(10 kgf-m, 72.5 Lbf-ft)
35 N·m
(3.5 Kg ...
Other materials:
Continuity check
Measure resistance across coupler “b” (between “a”
and “c” in figure).
If no continuity is indicated (infinity or over limit), the
circuit is open between terminals “a” and “c”.
Disconnect the coupler “b” and measure resistance
between couplers “a” and “b-1”.
If no continuity ...
Cushion rod bearing removal and installation
Removal
Remove the cushion rod. Refer to “cushion rod removal and installation”
.
Remove the cushion rod bearing with the special
tool.
Special tool
(a):
09921–20240 (bearing remover set)
Installation
Caution
the removed bearings must be replaced with
new on ...
Starter motor will not run
Note
make sure the fuses are not blown and the battery is fully-charged
before diagnosing.
Troubleshooting
Step
Action
Yes
No
1
Shift the transmission into neutral.
Grasp the clutch lever, turn on the ignition switch ...