Suzuki GSX-R 1000 Service Manual: Engine oil and filter replacement
Replace engine oil initially at 1 000 km (600 miles, 2 months) and every 6 000 km (4 000 miles, 12 months) thereafter
Replace oil filter initially at 1 000 km (600 miles, 2 months) and every 18 000 km (11 000 miles, 36 months) thereafter
Oil should be changed while the engine is warm. Oil filter replacement at the above intervals, should be done together with the engine oil change.
Engine oil replacement
- Place the motorcycle on the side-stand.
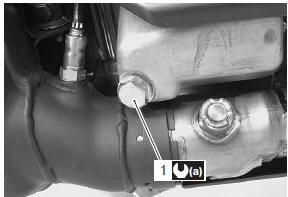
- Place an oil pan below the engine, and drain engine oil by removing the oil drain plug (1) and filler cap (2).
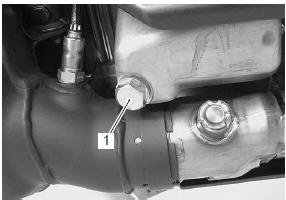
- Tighten the oil drain plug (1) to the specified torque.
 Caution Caution
|
Tightening torque oil drain plug (a): 23 n·m (2.3 Kgf-m, 16.5 Lbf-ft)
- Pour new oil through the oil filler. When performing
an oil change (without oil filter replacement), the
engine will hold about 2.8 L (3.0/2.5 Us/lmp qt) of oil.
Use of sf/sg or sh/sj in api with ma in jaso.
- Start up the engine and allow it to run for several minutes at idling speed.
- Turn off the engine and wait about three minutes.
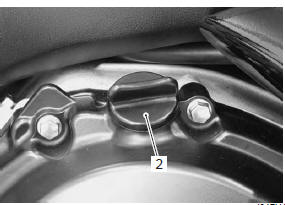
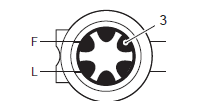
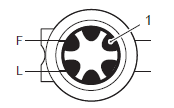
- Hold the motorcycle vertically and check the oil level through the inspection window (3). The oil level should be between the low level “l” and full level “f”.
Oil level inspection
- Place the motorcycle on the side-stand.
- Start up the engine and allow it to run for several minutes at idle speed.
- Turn off the engine and wait about three minutes.
- Hold the motorcycle vertically and check the oil level through the inspection window (1). The oil level should be between the low level “l” and full level “f”.
Oil filter replacement
- Remove the right side cowling. Refer to “exterior parts removal and installation” in section 9d .
- Drain engine oil as described in the engine oil replacement procedure.
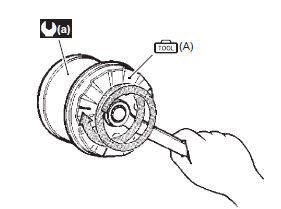
- Remove the oil filter (1) using the special tool.
Special tool
 (a): 09915–40610 (oil filter
wrench)

- Apply engine oil lightly to the o-ring of new oil filter, before installation.
 Caution Caution
Other manufacturer’s oil filters may differ in thread specifications (thread diameter and pitch), filtering performance and durability which may lead to engine damage or oil leaks. Also, do not use a genuine suzuki automobile oil filter on this motorcycle. |
- Install new oil filter. Turn it by hand until you feel that the oil filter o-ring contacts the oil filter mounting surface. Then, tighten the oil filter two full turns (or to specified torque) using the special tool.
| Note to properly tighten the oil filter, use the special tool. Never tighten the oil filter by hand only. |
Special tool
(a): 09915–40610 (oil filter wrench)
Tightening torque oil filter (a): 20 n·m (2.0 Kgf-m, 14.5 Lbf-ft)
- Add new engine oil and check the oil level is as described in the engine oil replacement procedure.
Necessary amount of engine oil oil change: 2 800 ml (3.0/2.5 Us/lmp qt) oil and filter change: 3 300 ml (3.5/3.0 Us/lmp qt) engine overhaul: 3 600 ml (2.8/3.2 Us/lmp qt)
 Fuel line inspection
Inspect fuel line
every 6 000 km (4 000 miles, 12 months)
Inspect the fuel line in the following procedures:
lift and support the fuel tank. Refer to “fuel tank
removal and installation” ...
 Throttle cable play inspection and adjustment
Inspect throttle cable play
initially at 1 000 km (600 miles, 2 months) and every
6 000 km (4 000 miles, 12 months) thereafter
Inspect and adjust the throttle cable play “a” as follows:
Throttle c ...
Other materials:
Clutch removal
Drain engine oil. Refer to “engine oil and filter replacement” in
section 0b .
Lift and support the fuel tank with the prop stay.
Refer to “fuel tank removal and installation” in section 1g .
Disconnect the ckp sensor coupler (1).
Remove the clutch cover (2).
...
Cam chain tensioner inspection
Inspect the cam chain tensioner in the following
procedures:
remove the cam chain tensioner. Refer to “cam chain guide / cam chain
tensioner removal and installation” .
Check the contacting surface of the cam chain
tensioner. If it is worn or damaged, replace it with a
new ...
Iap sensor removal and installation
Removal
Lift and support the fuel tank. Refer to “fuel tank
removal and installation” in section 1g (page 1g-
9).
Disconnect the coupler (1) and vacuum hose (2).
Remove the iap sensor (3) from the air cleaner box.
Installation
Install the iap sensor in the reverse ord ...