Suzuki GSX-R 1000 Service Manual: Front brake disc removal and installation
Removal
- Remove the front wheel assembly. Refer to “front wheel assembly removal and installation” in section 2d .
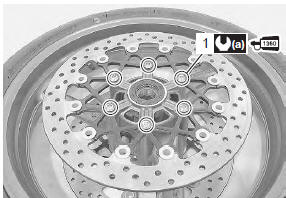
- Remove the front brake disc.
Installation
Install the front brake disc in the reverse order of removal. Pay attention to the following points:
- make sure that the brake disc is clean and free of any grease.
- Apply thread lock to the brake disc bolts (1) and tighten them to the specified torque.
 : Thread lock cement
99000–32130
(thread lock cement super “1360” or
equivalent)
Tightening torque brake disc bolt (front) (a): 18 n·m (1.8 Kgf-m, 13.0 Lbf-ft)
 Front brake caliper parts inspection
Refer to “front brake caliper disassembly and assembly” .
Brake caliper cylinder
Inspect the brake caliper cylinder wall for nicks,
scratches or other damage. If any damage is found,
replace the c ...
 Front brake disc inspection
Brake disc thickness
Check the brake disc for damage or cracks and measure
the thickness using the micrometer.
Replace the brake disc if the thickness is less than the
service limit or if defect ...
Other materials:
Damping force adjustment
The rebound and compression
damping force can be individually
adjusted by turning the respective
adjusters. The rebound damping
force adjuster 2 is located at the
top of the front fork. The compression
damping force adjuster 3 is
located at the bottom of the front
fork.
To adjust the da ...
Front fork removal and installation
Note
the right and left front forks are installed
symmetrically and therefore the removal
procedure for one side is the same as that for
the other side.
Removal
Remove the front wheel. Refer to “front wheel assembly removal and
installation” in section 2d .
...
Starting the engine
Before attempting to start the
engine, make sure:
The transmission is in neutral.
The engine stop switch is in
the "" position.
Note: this motorcycle has a
starter interlock system for the
ignition and starter circuit. The
engine can only be started if:
...