Suzuki GSX-R 1000 Service Manual: Oil pan / oil pressure regulator / oil strainer removal and installation
| Note the oil pan/oil strainer/oil pressure regulator cannot be serviced with the engine installed in the frame. |
Removal
- Remove the engine assembly from the frame. Refer to “engine assembly removal” in section 1d .
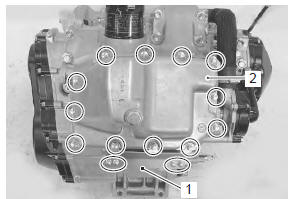
- Remove the plate (1).
- Remove the oil pan (2).
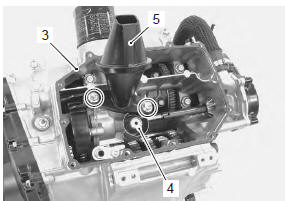
- Remove the gasket (3).
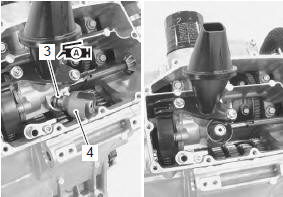
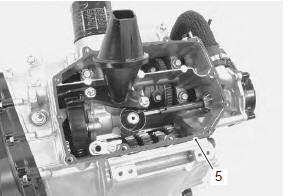
- Remove the oil pressure regulator (4) and oil strainer (5).
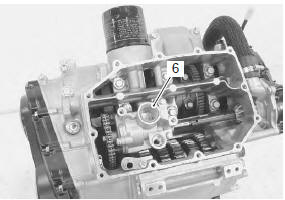
- Remove the o-ring (6).
Installation
Installation is in the reverse order of removal. Pay attention to the following points:
- apply grease to new o-ring (1).
| Caution use a new o-ring to prevent oil leakage. |
 : Grease 99000–25010 (suzuki
super
grease “a” or equivalent)
- Install the oil strainer (2).
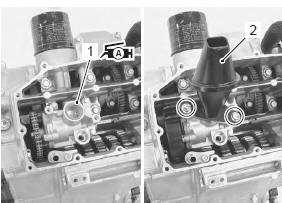
- Apply grease to new o-ring (3).
| Caution use a new o-ring to prevent oil leakage. |
 : Grease 99000–25010 (suzuki
super
grease “a” or equivalent)
- Push in the oil pressure regulator (4) to the oil pump as shown
- Install new gasket (5).
| Caution use new gasket to prevent oil leakage. |
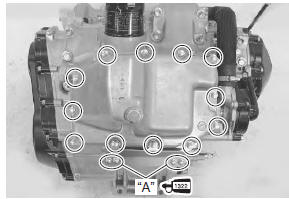
- Apply thread lock to the plate bolts “a”.
 : Thread lock cement
99000–32110
(thread lock cement super “1322” or
equivalent)
- Tighten the oil pan bolts and plate bolts diagonally to the specified torque.
Tightening torque oil pan bolt: 10 n·m (1.0 Kgf-m, 7.0 Lbf-ft)
 Repair instructions
Engine oil and filter replacement
Refer to “engine oil and filter replacement” in section 0b .
Engine oil level inspection
Refer to “engine oil and filter replacement” in section 0b . ...
 Oil pressure regulator / oil strainer
inspection
Oil pressure regulator / oil strainer
inspection
Refer to “oil pan / oil pressure regulator / oil strainer removal and
installation” .
Oil pressure regulator
Inspect the operation of the oil pressure regulator by
pushing the piston with a prope ...
Other materials:
DTC table
In the lcd (display) panel, the malfunction code is indicated from small code
to large code.
*1 To get the proper signal from the throttle position sensor, the sensor basic
position is indicated in the lcd
(display) panel. The malfunction code is indicated in three digits. In front o ...
Rear shock absorber inspection
Refer to “rear shock absorber removal and installation” .
Shock absorber
Inspect the rear shock absorber for damage and oil
leakage, and absorber bushing for wear and damage. If
any defect is found, replace the rear shock absorber with
a new one.
Caution
do not attempt to disassemble ...
Starter motor will not run
Note
make sure the fuses are not blown and the battery is fully-charged
before diagnosing.
Troubleshooting
Step
Action
Yes
No
1
Shift the transmission into neutral.
Grasp the clutch lever, turn on the ignition switch ...