Suzuki GSX-R 1000 Service Manual: Rear brake caliper disassembly and assembly
Refer to “rear brake caliper removal and installation” .
Disassembly
- Remove the pad spring (1) and rubber boot (2) from the caliper.

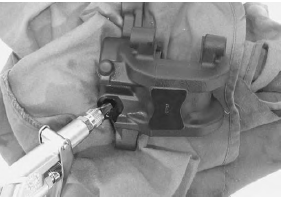
- Place a rag over the piston to prevent it from popping out and then force out the piston using compressed air.
| Caution do not use high pressure air to prevent piston damage. |
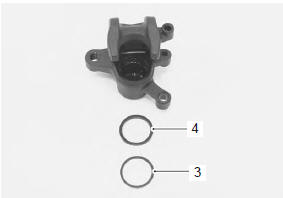
- Remove the dust seal (3) and piston seal (4).
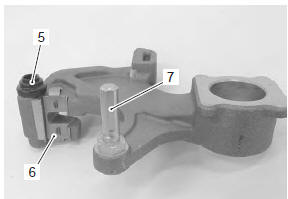
- Remove the rubber boot (5), pad spring (6) and sliding pin b (7) from the bracket.
Assembly
Assemble the caliper in the reverse order of disassembly. Pay attention to the following points:
- wash the caliper bore and piston with specified brake fluid. Particularly wash the dust seal groove and piston seal groove.
Bf: brake fluid (dot 4)
Caution
|

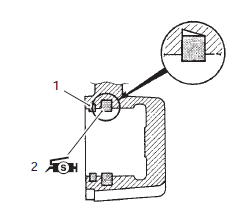
- Apply the brake fluid to dust seal (1).
Bf: brake fluid (dot 4)
- Apply grease to the piston seal (2).
 : Grease 99000–25100 (suzuki
silicone
grease or equivalent)
- Install the piston seal (2) as shown in the figure.
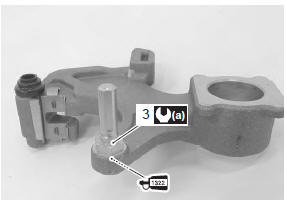
- Apply thread lock to the thread part and install the sliding pin b (3) to the bracket.
: Thread lock cement
99000–32110
(thread lock cement super “1322” or
equivalent)
Tightening torque rear caliper sliding pin b (a): 12 n·m (1.2 Kgf-m, 8.5 Lbf-ft)
- Install the rear brake caliper. Refer to “rear brake caliper removal and installation” .
 Rear brake caliper removal and installation
Removal
Remove the rear wheel. Refer to “rear wheel assembly removal and
installation” in section 2d .
Drain brake fluid. Refer to “brake fluid replacement” in section 4a .
Remo ...
 Rear brake caliper parts inspection
Refer to “rear brake caliper disassembly and assembly” .
Brake caliper cylinder
Inspect the brake caliper cylinder wall for nicks,
scratches or other damage. If any damage is found,
replace the ca ...
Other materials:
Battery
Battery connection in reverse polarity is strictly
prohibited. Such a wrong connection will damage the
components of the fi system instantly when reverse
power is applied.
Removing any battery terminal of a running engine is
strictly prohibited. The moment such removal is made,
...
Excva adjustment
Inspect the excva operation and adjust it if necessary
in the following steps:
Step 1
Set the excva to the adjustment position. Refer to
“excv cable removal and installation” (page 1k-
6).
Step 2
Turn the ignition switch off.
Turn the mode select switch off.
Turn the ...
Rear brake pedal adjustment
The rear brake pedal position
must be properly adjusted at all
times or the disk brake pads will
bear against the disk causing
damage to the pads and to the
disk surface. Adjust the brake
pedal posit~ on in the following
manner:
Loosen lock nut 1, and turn
the push rod 2 to locate t ...