Suzuki GSX-R 1000 Service Manual: Rear brake light switch inspection and adjustment
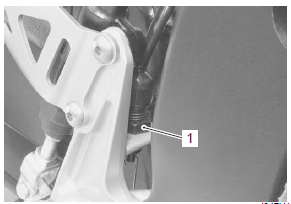
Check the rear brake light switch so that the brake light will come on just before pressure is felt when the brake pedal is depressed. If the brake light switch adjustment is necessary, turn the adjuster nut (1) in or out while holding the brake pedal.
Brake fluid level check
Refer to “brake system inspection” in section 0b .
Brake hose inspection
Refer to “brake system inspection” in section 0b .
 Rear brake light switch inspection
Inspect the rear brake light switch in the following
procedures:
lift and support the fuel tank. Refer to “fuel tank
removal and installation” in section 1g (page 1g-
9).
Discon ...
 Air bleeding from brake fluid circuit
Air trapped in the brake fluid circuit acts like a cushion to
absorb a large proportion of the pressure developed by
the master cylinder and thus interferes with the full
braking performance of the ...
Other materials:
Balancer shaft journal bearing inspection
and selection
Refer to “engine bottom side disassembly” (page 1d-
49).
Refer to “engine bottom side assembly” .
Inspection
Inspect the bearing surfaces for any signs of fusion,
pitting, burn or flaws. If any, replace them with a
specified set of bearings.
Selection
Place the plastigauge axial ...
Light bulb replacement
The wattage rating of each bulb is
shown in the following chart.
When replacing a burned-out
bulb, always use the same wattage
rating according to the following
chart.
Caution
Using a light bulb with the
wrong wattage rating can
cause electrical system damage
or shorte ...
Headlight removal and installation
Removal
Remove the body cowling assembly. Refer to “exterior parts removal and
installation” in section 9d .
Remove the air intake pipes (1). Refer to “exterior parts removal and
installation” in section 9d .
Remove the wiring harness no. 2 (2) By
disconnecting the couplers and ...