Suzuki GSX-R 1000 Service Manual: Clutch cable play inspection and adjustment
Inspect clutch cable play every 6 000 km (4 000 miles, 12 months)
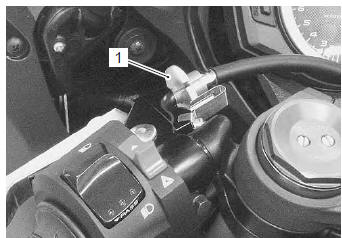
Inspect and adjust the clutch cable play “a” as follows.
Clutch cable play “a” 10 – 15 mm (0.4 – 0.6 In)
- Lift and support the fuel tank. Refer to “fuel tank removal and installation” in section 1g (page 1g- 9).
- Turn in the adjuster (1) all the way into the clutch lever assembly.
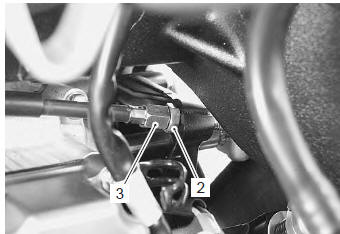
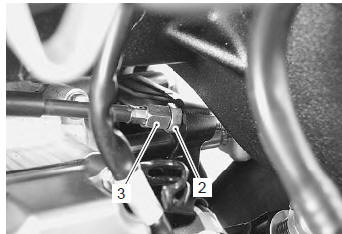
- Loosen the lock-nut (2) and turn the clutch cable adjuster (3) to obtain proper cable play.
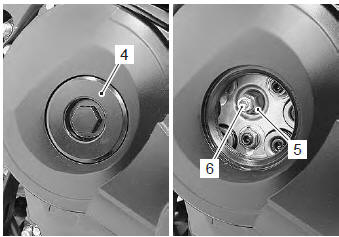
- Remove the clutch release adjuster cap (4).
- Loosen the lock-nut (5) and turn out the clutch release adjusting screw (6) two or three rotations.
- From that position, slowly turn in the clutch release adjusting screw (6) until resistance is felt.
- From this position, turn out the clutch release adjusting screw (6) 1 rotation, and tighten the locknut (5) while holding the screw (6).
Tightening torque clutch release adjusting screw lock-nut: 6 n·m ( 0.6 Kgf-m, 4.5 Lbf-ft)
- Turn the cable adjuster (3) to obtain 10 – 15 mm (0.4 – 0.6 In) of free play “a” at the clutch lever end.
- Tighten the lock-nut (2).
- Install the clutch release adjuster cap (4).
Tightening torque clutch release adjuster cap: 11 n·m (1.1 Kgf-m, 8.0 Lbf-ft)
- Reinstall the fuel tank.
 Cooling system inspection
Inspect cooling system
every 6 000 km (4 000 miles, 6 months)
Replace engine coolant
every 2 years
Engine coolant level inspection
Hold the motorcycle vertically.
Check the engine cool ...
 Drive chain inspection and adjustment
Inspect drive chain
initially at 1 000 km (600 miles, 2 months) and every
6 000 km (4 000 miles, 12 months) thereafter
Drive chain visual check
With the transmission in neutral, support the
m ...
Other materials:
Front brake master cylinder / brake lever disassembly and assembly
Refer to “front brake master cylinder assembly removal and installation” .
Disassembly
Remove the reservoir cap (1), plate (2), diaphragm
(3) and reservoir tank (4).
Remove the brake light switch (5) and brake lever
(6).
Remove the dust boot (7) and push rod (8).
...
Loading guidelines
This motorcycle is primarily
intended to carry small items
when you are not riding with a
passenger. Follow the guidelines
below to carry a passenger or
cargo:
balance the load between the
left and right side of the motorcycle
and fasten it securely.
Place cargo weight as ...
DTC “c46” (p1657-h/l or p1658): excv
actuator circuit malfunction
Detected condition
Possible cause
C46
The operation signal does not reach the
excv actuator.
Excva position sensor voltage low or
high
0.14 V ≤ Sensor voltage < 4.9 V
(without the above range)
excva can not operate properly.
Excva ...