
Suzuki GSX-R 1000 Owners Manual: Damping force adjustment
The rebound and compression damping force can be individually adjusted by turning the respective adjusters. The rebound damping force adjuster 1 is located at the bottom of the rear suspension.
The compression damping force adjuster 2 is located at the left side of the motorcycle.
To adjust the damping force, set the adjuster to the standard setting first and then adjust the adjuster to the desired position.
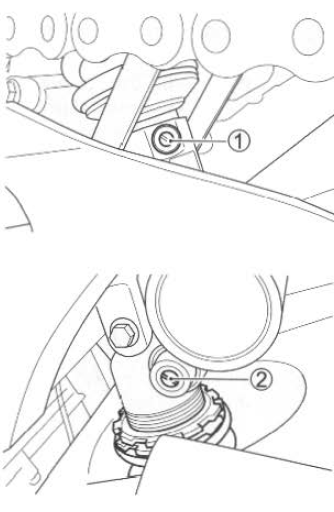
To set the rebound and compression damping force, turn the adjuster clockwise until it stops and then turn it counterclockwise.
As you turn the adjuster, you will notice clicks. Count the number of clicks from fully turned-in position.
The standard rebound damping force setting is 12 clicks. The standard compression damping force setting is 14 clicks.
Turn the adjuster clockwise from the standard position to stiffen the damping force. Turn the adjuster counterclockwise to soften the damping force. The damping force should be adjusted gradually, 1/4 turn at a time, to fine-tune the suspension.
 Spring pre-load adjustment
The adjustment can be performed
by changing the adjuster ring
position. However, suzuki recommends
that this adjustment be
done by your authorized suzuki
dealer, since a special tool is
need ...

Other materials:
Muffler / muffler chamber / exhaust pipe
removal and installation
Removal
Loosen the muffler connecting bolts (1).
Remove the mufflers (2) by removing the mounting
bolt and nut (3).
Note
support the muffler to prevent it from falling.
Remove the side cowlings. Refer to “exterior parts
removal and installation” in secti ...
Generator inspection
Generator coil resistance
Remove the left side cowling. Refer to “exterior parts removal and
installation” in section 9d .
Disconnect the generator coupler (1).
Measure the resistance between the three lead
wires.
If the resistance is out of specified value, replace the
...
Conrod crank pin bearing removal and
installation
Refer to “engine bottom side disassembly” (page 1d-
49).
Refer to “engine bottom side assembly” .
Removal
Remove the conrod crank pin bearings (1).
Note
do not remove the bearings (1) unless
absolutely necessary.
Make a note of where the bearings are
removed ...