
Suzuki GSX-R 1000 Owners Manual: Inspecting the drive chain
When inspecting the chain, look for the following:
- loose pins
- damaged rollers
- dry or rusted links
- kinked or binding links
- excessive wear
- improper chain adjustment
If you find anything wrong with the drive chain condition or adjustment, correct the problem if you know how. If necessary, consult your authorized suzuki dealer.
Damage to the drive chain means that the sprockets may also be damaged. Inspect the sprockets for the following:
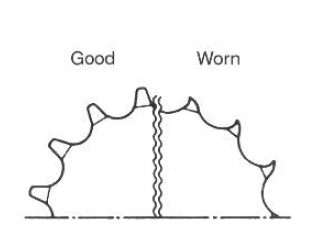
- Excessively worn teeth
- broken or damaged teeth
- loose sprocket mounting nuts
Note
: the two sprockets should be inspected for wear when a new chain is installed and replaced if necessary.
If you find any of these problems with your sprocket, consult yoursuzuki dealer.
 Warning Warning
An incompletely riveted master link, or a joint-clip type master link, may come apart and cause an accident or severe engine damage. Do not use a joint-clip type chain. Chain replacement requires a special riveting tool and a high-quality, non-jointclip type chain. Ask an authorized suzuki dealer or qualified mechanic to perform this work. |
 Drive chain
This motorcycle has a master link
type drive chain. We recommend
that you take your motorcycle to
an authorized suzuki dealer if the
drive chain needs replacing.
The condition and adjustment of ...
 Drive chain cleaning and
oiling
Drive chain cleaning and
oiling
Clean and oil the chain as follows:
Wash the chain with kerosene.
Kerosene will lubricate and
clean the chain.
Warning
Kerosene can be hazardous .
Kerosene is flammable. ...
Other materials:
Muffler / muffler chamber / exhaust pipe
removal and installation
Removal
Loosen the muffler connecting bolts (1).
Remove the mufflers (2) by removing the mounting
bolt and nut (3).
Note
support the muffler to prevent it from falling.
Remove the side cowlings. Refer to “exterior parts
removal and installation” in secti ...
DTC “c31” (p0705): gp switch circuit
malfunction
Detected condition and possible cause
Detected condition
Possible cause
No gear position switch voltage
Gp switch voltage is not within the following range.
Gp switch voltage > 0.6 V
Gp switch circuit open or short.
Gp switch malfunction.
...
Oil pan / oil pressure regulator / oil strainer
removal and installation
Note
the oil pan/oil strainer/oil pressure regulator
cannot be serviced with the engine installed
in the frame.
Removal
Remove the engine assembly from the frame. Refer to “engine assembly
removal” in section 1d .
Remove the plate (1).
Remove the oil pan ...