Suzuki GSX-R 1000 Service Manual: Pair system inspection
Pair hose
- Lift and support the fuel tank with the prop stay.
Refer to “fuel tank removal and installation” in section 1g .
- Remove the air cleaner box. Refer to “air cleaner box removal and installation” in section 1d .
- Inspect the pair hoses for wear or damage. If it is worn or damaged, replace the pair hose with a new one. Refer to “pair system hose routing diagram” .
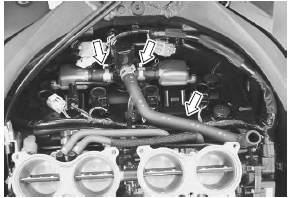
- Reinstall the removed parts.
Pair reed valve
- Remove the pair reed valves. Refer to “pair reed valve removal and installation” .
- Inspect the reed valves for carbon deposit.
If carbon deposit is found on the reed valve, replace the pair reed valve with a new one.
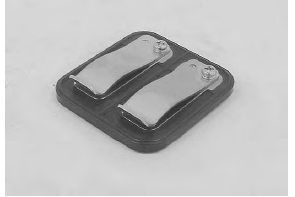
- Reinstall the pair reed valves. Refer to “pair reed valve removal and installation” .
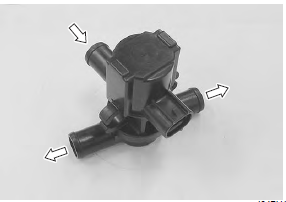
Pair control solenoid valve
| Note pair control solenoid valve can be checked without removing it from the motorcycle. Refer to “dtc “c49” (p1656): pair control solenoid valve circuit malfunction” in section 1a . |
- Remove the pair control solenoid valve. Refer to “pair control solenoid valve removal and installation” .
- Check that air flows through the air inlet port to the air outlet ports. If air does not flow out, replace the pair control solenoid valve with a new one.
- Connect the 12 v battery to the pair control solenoid valve terminals and check the air flow. If air does not flow out, the solenoid valve is in normal condition.
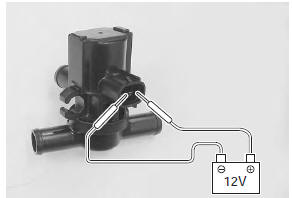
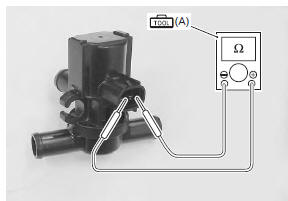
- Check the resistance between the terminals of the pair control solenoid valve.
Special tool
 (a): 09900–25008 (multi circuit
tester set)
Tester knob indication resistance (Ω)
Pair control solenoid valve resistance 20 – 24 Ω at 20 – 30 °c (68 – 86 °f)
- Reinstall the pair control solenoid valve. Refer to “pair control solenoid valve removal and installation” .
 Pair control solenoid valve removal and
installation
Pair control solenoid valve removal and
installation
Removal
Lift and support the fuel tank with the prop stay.
Refer to “fuel tank removal and installation” in section 1g .
Remove the air cleaner box. Refer to “air cleaner box removal and ...
 Crankcase breather (pcv) hose inspection
Inspect the crankcase breather (pcv) hose in the
following procedures:
lift and support the fuel tank with the prop stay.
Refer to “fuel tank removal and installation” in section 1g .
& ...
Other materials:
DTC “c40” (p0505 / p0506 / p0507): isc
valve circuit malfunction
Detected condition and possible cause
Detected condition
Possible cause
C40/P0505
The circuit voltage of motor drive is
unusual.
Isc valve circuit open or shorted to ground.
Air passage clogged.
Isc valve is fixed.
Isc valve prese ...
Gearshift lever
This motorcycle has a 6-speed
transmission which operates as
shown. To shift properly, squeeze
the clutch lever and close the
throttle at the same time you
operate the gearshift lever. Lift the
gearshift lever to upshift and
depress the lever to downshift.
Neutral is located between lo ...
Modification
Modification of the motorcycle, or
removal of original equipment
may render the vehicle unsafe or
illegal. Obey all applicable equipment
regulations in your area.
The frame of this motorcycle is
made of an aluminum alloy.
Therefore, never make any modifications
such as drilling or weldin ...