Suzuki GSX-R 1000 Service Manual: Radiator / cooling fan motor removal and installation
Removal
- Remove the inner under cowlings. Refer to “exterior parts removal and installation” in section 9d .
- Drain engine coolant. Refer to “cooling system inspection” in section 0b .
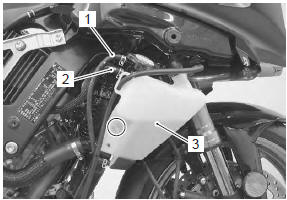
- Disconnect the reservoir tank inlet hose (1) and water air bleed hose (2).
- Remove the radiator reservoir tank (3).
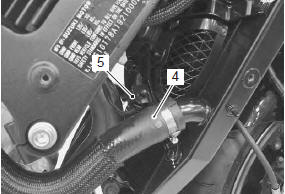
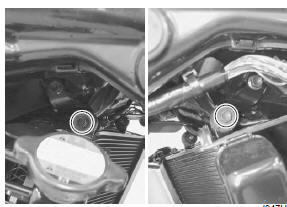
- Disconnect the radiator inlet hose (4).
- Disconnect the cooling fan motor coupler (5).
- Remove the oil cooler (6) from the bracket.
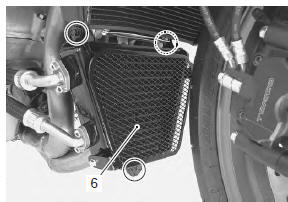
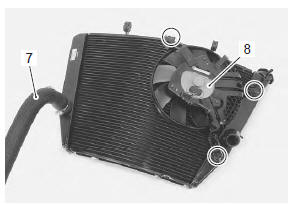
- Remove the radiator assembly by removing the bolts.
- Remove the radiator outlet hose (7) and cooling fan motor (8) from the radiator.
Installation
Install the radiator in the reverse order of removal. Pay attention to the following points:
- install the radiator and oil cooler to their bracket. Refer to “radiator inspection and cleaning” .
- Apply thread lock to the reservoir tank bolt and tighten it securely.
 : Thread lock cement
99000–32110
(thread lock cement super “1322” or
equivalent)
- Connect the radiator hoses securely. Refer to “water hose routing diagram” .
- Pour engine coolant. Refer to “cooling system inspection” in section 0b .
- Bleed air from the cooling circuit. Refer to “cooling system inspection” in section 0b .
 Radiator inspection and cleaning
Radiator hose inspection
Refer to “cooling system inspection” in section 0b .
Radiator inspection
Inspect the radiator for water leaks. If any defects are
found, replace the radiator with a new on ...
 Water hose inspection
Inspect the water hoses in the following procedures:
remove the side cowlings. Refer to “exterior parts
removal and installation” in section 9d (page 9d-
6).
Check the water hose ...
Other materials:
Special tools and equipment
Recommended service material
Note
required service material is also described in the following.
“Front fork components”
Special tool
...
Air cleaner box removal and installation
Removal
Lift and support the fuel tank. Refer to “fuel tank
removal and installation” in section 1g (page 1g-
9).
Remove the air cleaner box cover. Refer to “air cleaner element removal
and installation” .
Remove the air cleaner mounting bolt.
Remove the air clea ...
Camshaft sprocket
Inspect the camshaft sprocket in the following
procedures:
remove the intake and exhaust camshafts. Refer to “engine top side
disassembly” .
Inspect the teeth of each camshaft sprocket for wear
or damage.
If they are worn or damaged, replace the sprocket/
camshaft assembl ...