Suzuki GSX-R 1000 Service Manual: Rear shock absorber removal and installation
Removal
- Remove the right side cowling and side frame covers. Refer to “exterior parts removal and installation” in section 9d .
- Support the motorcycle with a jack to relieve load on the rear shock absorber.
- Remove the left muffler and muffler chamber heat guard no. 2. Refer to “muffler / muffler chamber / exhaust pipe removal and installation” in section 1k .
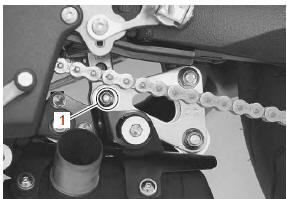
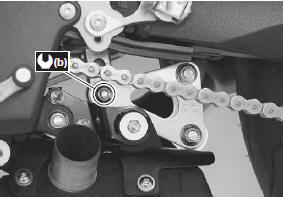
- Remove the rear shock absorber lower mounting bolt and nut (1).
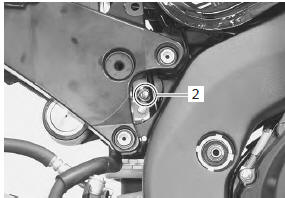
- Remove the rear shock absorber upper mounting bolt and nut (2).
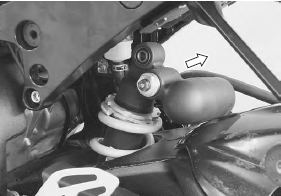
- Remove the rear shock absorber upward
Installation
Install the rear shock absorber in the reverse order of removal. Pay attention to the following points:
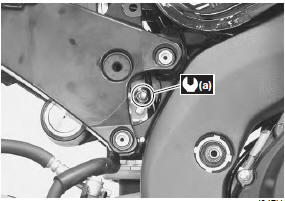
- tighten the rear shock absorber upper/lower mounting bolts and nuts.
Tightening torque rear shock absorber upper mounting nut (a): 50 n·m (5.0 Kgf-m, 36.0 Lbf-ft) rear shock absorber lower mounting nut (b): 50 n·m (5.0 Kgf-m, 36.0 Lbf-ft)
- Install the left muffler and muffler chamber heat guard no. 2. Refer to “muffler / muffler chamber / exhaust pipe removal and installation” in section 1k .
- Install the side frame covers and right side cowling.
Refer to “exterior parts removal and installation” in section 9d .
Rear suspension inspection
Refer to “rear suspension inspection” in section 0b .
 Rear suspension assembly construction
Rear shock absorber mounting bolt (upper)
Rear shock absorber mounting nut (lower)
Cushion rod mounting nut (front)
Cushion rod mounting nut (rear)
Cushion lever mo ...
 Rear shock absorber inspection
Refer to “rear shock absorber removal and installation” .
Shock absorber
Inspect the rear shock absorber for damage and oil
leakage, and absorber bushing for wear and damage. If
any defect is foun ...
Other materials:
Engine components removable with the
engine in place
Engine components which can be removed while the engine is installed on the
frame are as follows. For the installing
and removing procedures, refer to respective paragraphs describing each
component.
Center of engine
Item
Removal
Inspection
Installation
...
Self-diagnosis function
The self-diagnosis function is incorporated in the ecm. The function has two
modes, “user mode” and “dealer mode”.
The user can only be notified by the lcd (display) panel and led (fi indicator
light). To check the function of the
individual fi system devices, the dealer mode is provided. In ...
Water pump removal and installation
Removal
Note
before draining engine oil and engine coolant, inspect engine oil and
coolant leakage between the water pump and crankcase. If engine oil is
leaking, visually inspect the oil seal and o-ring. If engine coolant is
leaking, visually inspect the mechanical seal and s ...