Suzuki GSX-R 1000 Service Manual: Rear wheel related parts inspection
Refer to “rear wheel assembly removal and installation” .
Tire
Refer to “tire inspection” in section 0b .
Rear brake disc
Refer to “rear brake disc inspection” in section 4c .
Wheel damper
Refer to “drive chain related parts inspection” in section 3a .
Sprocket
Refer to “drive chain related components” in section 3a .
Dust seal
Inspect the dust seal lip for wear or damage. If any defects is found, replace the dust seal with a new one.
Refer to “rear wheel dust seal / bearing removal and installation” .
Wheel axle
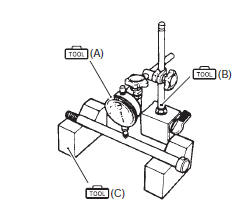
Using a dial gauge, check the wheel axle for runout, if the runout exceeds the limit, replace the axle shaft.
Wheel axle runout service limit: 0.25 Mm (0.010 In)
Special tool
 (a): 09900–20607 (dial gauge)
 (b): 09900–20701 (dial gauge
chuck)
 (c): 09900–21304 (v blocks)
Wheel
- Remove the rear brake pads. Refer to “rear brake pad replacement” in section 4c .
- Make sure that the wheel runout checked as shown in the figure does not exceed the service limit. An excessive runout is usually due to worn or loosened wheel bearings and can be reduced by replacing the bearings. If bearing replacement fails to reduce the runout, replace the wheel.
Wheel rim runout service limit (axial and radial): 2.0 Mm (0.08 In)
- Install the rear brake pads. Refer to “rear brake pad replacement” in section 4c .
Bearing
Inspect the play of the wheel bearings by hand while they are in the wheel. Rotate the inner race by hand to inspect for abnormal noise and smooth rotation. Replace the bearing if there is anything unusual. Refer to “rear wheel dust seal / bearing removal and installation” .

 Rear wheel assembly removal and installation
Removal
Loosen the axle nut (1).
Raise the rear wheel off the ground and support the
motorcycle with a jack or wooden block.
Caution
make sure that the motorcycle is support ...
 Rear wheel dust seal / bearing removal and installation
Removal
Remove the rear wheel assembly. Refer to “rear wheel assembly removal
and installation” .
Remove the rear sprocket mounting drum assembly
(1) from the rear wheel.
Re ...
Other materials:
Diagnostic information and procedures
Starting system symptom diagnosis
Condition
Possible cause
Correction / reference item
Engine does not turn
though the starter motor
runs
Faulty starter clutch.
Replace.
Starter button is not
effective
Run down battery
Repair or replac ...
Exterior parts removal and installation
Side frame cover
Removal
Note
the left and right side frame covers are
installed symmetrically and therefore the
removal/installation procedure for one side is
the same as that for the other side.
Remove the bolt (1).
Remove the side frame cover (2).
...
Cooling system inspection
Inspect cooling system
every 6 000 km (4 000 miles, 6 months)
Replace engine coolant
every 2 years
Engine coolant level inspection
Hold the motorcycle vertically.
Check the engine coolant level by observing the “f” and “l” lines on
the engine coolant reservoir tank. If the level i ...