Suzuki GSX-R 1000 Service Manual: Rear wheel assembly removal and installation
Removal
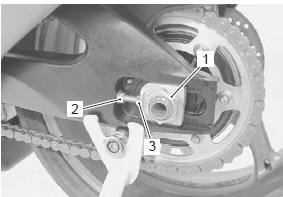
- Loosen the axle nut (1).
- Raise the rear wheel off the ground and support the motorcycle with a jack or wooden block.
| Caution make sure that the motorcycle is supported securely. |
- Remove the axle nut (1).
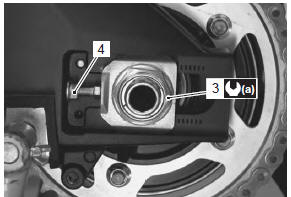
- Loosen the left and right lock-nuts (2) and turn in the adjuster bolts (3).
- Draw out the rear axle.
- Remove the rear wheel by disengaging the drive chain.
| Caution do not operate the rear brake pedal with the rear wheel removed. |
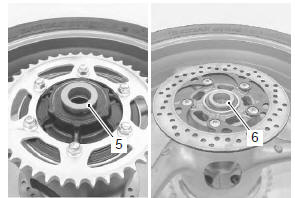
- Remove the collars (5) and (6).
Installation
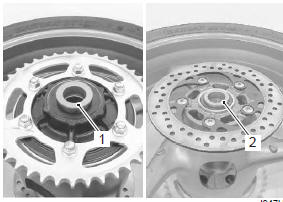
- Install the collars (1) and (2).
- Remount the rear wheel and rear axle, tighten the rear axle nut (3) temporarily.
- Adjust the chain slack after installing the rear wheel.
Refer to “drive chain inspection and adjustment” in section 0b .
- Tighten the rear axle nut (3) to the specified torque.
Tightening torque rear axle nut (a): 100 n·m (10.0 Kgf-m, 72.5 Lbfft)
 After remounting
|
- Tighten both chain adjuster lock-nut (4) securely.
 Rear wheel assembly construction
Rear sprocket nut
Rear axle nut
Brake disc bolt
Clearance
60 N·m (6.0 Kgf-m,
43.0 Lbf-ft)
100 N·m
(10 kgf-m, 72.5 Lbf-ft)
35 N·m
(3.5 Kg ...
 Rear wheel related parts inspection
Refer to “rear wheel assembly removal and installation” .
Tire
Refer to “tire inspection” in section 0b .
Rear brake disc
Refer to “rear brake disc inspection” in section 4c .
Wheel damper
...
Other materials:
Starter motor components
O-ring
Housing end (inside)
O-ring
Starter motor case
Armature
Housing end (outside)
10
N·m (1.0 Kgf-m, 7.0 Lbf-ft)
4 N·m (0.4
Kgf-m, 3.0 Lbf-ft)
5 N·m (0.5
Kgf-m, 3.5 Lbf-ft)
Apply grease to sliding
surface
Apply moly ...
Sds check
Using sds, sample the data at the time of new and periodic vehicle
inspections.
After saving the sampled data in the computer, file them by model and by user.
The periodically filed data help improve the accuracy of troubleshooting since
they can indicate the condition of vehicle
function ...
Front brake components
Seal set
Piston and seal set
Brake pad spring
Brake pad set
Front brake disc
7.5
N·m (0.75 Kgf-m, 5.5 Lbf-ft)
15 N·m (1.5
Kgf-m, 11.0 Lbf-ft)
39 N·m (3.9
Kgf-m, 28.0 Lbf-ft)
18 N·m (1.8
Kgf-m, 13.0 Lbf-ft)
Apply thread lo ...