Suzuki GSX-R 1000 Owners Manual: Spring pre-load adjustment
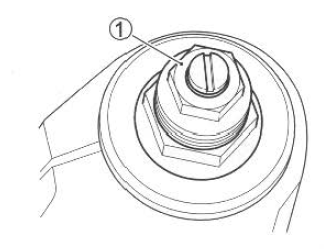
To change the spring pre-load, turn the adjuster 1 clockwise or counterclockwise. Turning the adjuster clockwise will increase the spring pre-load. Turning the adjuster counterclockwise will decrease the spring pre-load.
There are five grooved lines on the side of the adjuster 1 for reference.
Position 5 provides the minimum spring pre-load and position 0 provides the maximum pre-load. This motorcycle is delivered from the factory with its adjuster set on position 4.


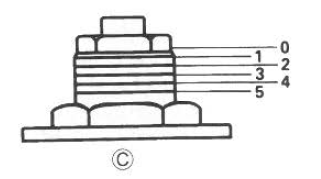
- Position 0
- Position 4
- Position 5
 Front suspension
...
 Damping force adjustment
The rebound and compression
damping force can be individually
adjusted by turning the respective
adjusters. The rebound damping
force adjuster 2 is located at the
top of the front fork. The compr ...
Other materials:
Starter relay removal and installation
Removal
Turn the ignition switch off.
Remove the front seat. Refer to “exterior parts
removal and installation” in section 9d (page 9d-
6).
Disconnect the battery (–) lead wire (1) from the
battery.
Remove the starter relay cover (2) and disconnect
the starter rel ...
Front brake master cylinder components
Reservoir cap
Plate
Diaphragm
Reservoir tank
Master cylinder
Dust boot
Piston set
Brake lever
Brake lever pivot bolt
Brake lever pivot bolt lock-nut
Brake light switch
Brake hose union bolt
Brake hose
23 N·m (2.3 Kgf-m,
...
Front brake hose routing diagram
Hose clamp
: clamp end should face downward.
Stopper
: after the brake hose union has contacted to the stopper, tighten
the union bolt.
Hose guide
: pass the brake hose through the hose guide.
Stopper
: after positioning the clamp with the stopper ...